

Day one of a home painting project in Toronto sets the tone for everything that follows, from the first knock on the door to the last strip of tape pulled at night. Most homeowners expect wet paint on the walls by lunch, but a well-run crew spends the first day confirming scope, protecting the house, and testing surfaces before any finish coat goes on. That gap between expectation and reality causes more first-day stress than any other part of the job. Home Painters Toronto has painted 20,000+ homes across Toronto and the GTA since 1991, and our 1,200+ positive reviews on HomeStars, Google, and Houzz often mention how calm and organized the start felt. This guide covers the arrival walkthrough, job site setup, surface testing, and how the first day changes for condos, exteriors, and short jobs.
On day one of a home painting project, the crew arrives, walks each room with you, confirms colours and scope against the written estimate, protects floors and furniture, and starts prep such as patching, sanding, and caulking. On larger jobs, finish coats usually begin on day two. One-day projects compress every step into a single visit.
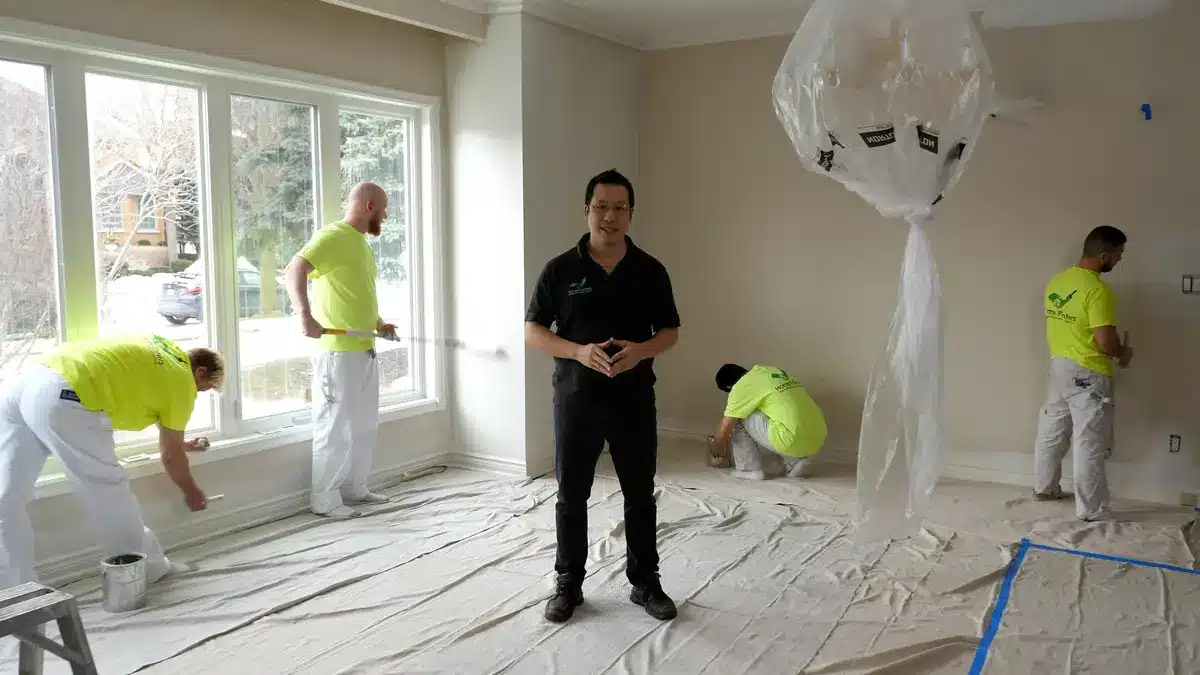
A well-run crew spends the first day confirming scope, protecting the house, and testing surfaces
Day One of a Home Painting Project: The Arrival Walkthrough
Day one of a home painting project starts with a room-by-room walkthrough, where the crew lead and homeowner confirm the signed scope before any tools come off the truck. This walkthrough is the most important step of the first day. It locks in what gets painted, which colour goes where, and what condition each surface is in today. On every interior painting project we run, the walkthrough follows the same five steps.
- Crew introductions. The crew lead introduces each painter by name, so you know exactly who is in your home and who to ask for.
- Scope review. The lead reads the written estimate room by room and points to every wall, ceiling, door, and trim run it covers.
- Colour and sheen check. Each room's colour code, product line, and sheen get matched against the labels on the cans sitting on site.
- Condition notes. The lead flags existing cracks, nail pops, water stains, and loose trim, so both sides agree on the starting point.
- Access and schedule. The crew confirms which entrance, washroom, and parking spot they can use, plus their daily start and finish times.
A shared record of existing conditions protects the homeowner as much as the crew. If a hairline ceiling crack gets noted on day one, nobody argues later about who caused it. Our crew leads photograph flagged areas on the spot so the notes match what everyone saw. That same record feeds the final walkthrough at the end of the project.
Confirming Scope, Colours, and Sheen on Day One of a Home Painting Project
The crew lead checks every can label against the signed colour schedule before mixing starts, because colour mistakes get caught or missed in the first hour. Two whites from the same fan deck can look nearly identical on a chip and read very differently on a north-facing wall. Sheen matters just as much. A flat finish hides wall flaws well, while eggshell or pearl stands up better to scuffs in hallways and kids' rooms.
If you are still torn between two shades, our colour inspiration gallery shows real rooms that can help settle it before the brushes come out. Any change you make gets written into the work order right away. That keeps the crew, the office, and the final invoice on the same page.
How the Crew Sets Up the Job Site
The crew sets up the job site by laying floor protection, moving and covering furniture, removing or masking fixtures, and staging all equipment in one agreed spot before prep begins. Setup usually fills the first part of the morning on a multi-room job. Good setup keeps a clean house clean, since sanding dust and primer spatter travel further than most people expect. The table below shows how our crews handle each area on a typical interior residential painting project.
| Area | Day One Protection | Why It Matters |
|---|---|---|
| Hardwood and tile floors | Canvas drop cloths in work zones, plus a taped paper runner along main walkways | Canvas absorbs drips and stays put, while loose plastic gets slippery underfoot |
| Carpet | Plastic taped along the edges with canvas laid on top | Stops paint from wicking into carpet fibres at the baseboard line |
| Furniture | Moved to the centre of the room and wrapped in plastic sheeting | Keeps sanding dust out of fabric, drawers, and electronics |
| Switch plates and outlet covers | Removed, bagged, and labelled by room | Allows clean cut lines and a tidy reinstall |
| Heating and return-air vents | Covered with plastic and tape during sanding | Stops fine dust from circulating through the ductwork |
| Light fixtures | Loosened and wrapped, or masked in place | Protects finishes and wiring from drips |
| Entry and hallway | Floor runner from the door to the work area | Protects the path the crew walks all day long |
Staging matters more than most homeowners realize. Our crews pick one staging area for paint, ladders, and mixing, usually a garage, a basement corner, or a tarped section of a spare room. Keeping everything in one place means fewer trips through finished rooms and less risk of a tipped can. Vans park in the driveway or a legal street spot agreed on during the walkthrough.
Protection stays down for the whole project, not just the first day. The crew checks drop cloths and tape each morning and replaces anything that has shifted or torn. Furniture stays covered until the last coat in that room has dried. This daily reset is part of what separates a professional crew from a rushed one.
What Gets Done on Day One and What Waits
On a multi-day project, day one covers setup and surface prep such as patching, sanding, caulking, and spot priming, while full finish coats usually start on day two. Prep takes this long because each repair has to cure before paint goes over it. Rushing a topcoat over wet patching compound causes flashing, where the repaired spot dries with a different sheen than the wall around it. The table below shows a typical first-day sequence on a three- or four-room interior job.
| Part of the Day | Main Activity | Homeowner Involvement |
|---|---|---|
| Arrival | Introductions and room-by-room walkthrough | Present for scope, colour, and condition sign-off |
| Early morning | Furniture moved, floors and fixtures protected | Point out fragile items or anything off-limits |
| Late morning | Nail holes, cracks, and dents filled, and failed caulking cut out | Approve any extra repairs found during prep |
| Afternoon | Patches sanded, dust vacuumed, stains and repairs spot-primed | Available by phone |
| End of day | Rooms tidied, tools staged, next-day plan reviewed | Short check-in with the crew lead |
Primer and patch dry times set the pace for the rest of the week. Benjamin Moore lists a recoat window of 1 to 2 hours for Regal Select Eggshell at 25°C and 50% relative humidity, and its data sheet notes that cool, humid rooms stretch that time. Deeper repairs, such as a failed tape joint or a water-damaged ceiling patch, often need an overnight cure. That is why larger drywall repair work tends to start on day one even when painting starts on day two.
Some finish work does happen on the first day. Ceilings in empty rooms, closets, and walls with little repair often get a first coat by mid-afternoon. The crew lead decides this during the walkthrough based on what each room needs. A crew that paints everything in the first few hours has usually cut corners on prep.
Why a Good Crew Tests Surfaces Before Opening a Can
A good crew tests surfaces on day one because temperature, old lead paint, moisture, and weak existing coatings decide which products and methods are safe to use. These checks take minutes, but they head off the most common reasons a new paint job fails early. Most first-day guides skip this step entirely. Here are the five checks our crews run before any finish paint gets opened.
| Test | Tool Used | What It Tells the Crew |
|---|---|---|
| Surface temperature | Infrared thermometer | Whether walls meet the minimum application temperature on the paint's technical data sheet |
| Lead screen | Lead swab test kit on old paint layers | Whether sanding and scraping need lead-safe methods |
| Adhesion | Tape pulled from a scored patch of old paint | Whether old paint is bonded well enough to paint over |
| Moisture | Pin or pinless moisture meter | Whether past leaks left damp drywall or plaster behind |
| Coating type | Rubbing alcohol swab on glossy trim | Whether old oil-based trim needs a bonding primer before latex |
Each result changes the plan for the day. A failed tape test means scraping and priming before any colour goes on, because new paint only sticks as well as the layer under it. A high moisture reading means finding the source first, since paint over damp drywall tends to blister and let stains bleed through. Glossy oil-based trim needs a scuff sand and bonding primer, or latex topcoats can peel off in sheets.
Lead Paint Checks in Pre-1960 Toronto Homes
Lead checks matter in Toronto because many Victorian and Edwardian semis in Leslieville, Riverdale, and the Annex still carry their original paint layers under newer coats. Health Canada advises that homes built before 1960 probably contain lead-based paint, and that exteriors of homes built between 1960 and 1990 may contain it too. The same guidance warns against using sanders, heat guns, or blowlamps on old paint, since these create lead dust and fumes. When a swab tests positive, our crew switches to lead-safe methods before prep continues.
Lead-safe prep means sealed plastic containment, wet scraping, HEPA vacuuming, and careful cleanup at the end of each day. Families with young children or a pregnancy in the home should mention it at the walkthrough. The crew can then plan the order of rooms around nap times and keep kids clear of active work zones.
A Day One Case Study From Leslieville
- At a recent interior repaint of a semi-detached home in Leslieville, day one uncovered two problems we solved before they cost the homeowner anything. The job covered the main floor, three upstairs bedrooms, and a finished basement, all in Benjamin Moore Regal Select in Eggshell.
- During the walkthrough, our infrared thermometer read 8°C on the basement's exterior wall, while the room air sat at 15°C. Benjamin Moore's technical data sheet sets a 10°C minimum air and surface temperature for Regal Select Eggshell, so painting that wall on schedule would have risked poor film formation. We set up heaters, moved the basement to day three, and started on the warmer main floor.
- The second issue showed up upstairs. A lead swab on the original window casings turned positive, which fit the home's early-1900s build. The crew sealed off that bedroom with plastic, wet-scraped the loose paint, and HEPA-vacuumed before priming. On day three, the basement wall read 14°C, and the crew painted it that morning. The whole project still wrapped up on its original finish date.

Surface testing on day one heads off the most common reasons a new paint job fails early
What the Homeowner Should Be Available For
Homeowners should be present for the opening walkthrough and reachable by phone for the rest of day one, but they do not need to stay home all day. The walkthrough is the one part of the day that truly needs you on site. After that, the crew only needs quick answers to a few types of questions.
- Scope and colour sign-off. You confirm each room, colour, and sheen before work starts.
- Access details. The crew needs to know about locked rooms, alarm codes, pets, and any spaces that are off-limits.
- Hidden damage decisions. If prep uncovers soft drywall, water damage, or loose trim, the crew lead explains the fix and the price before doing it.
- Added work. Extra rooms get priced and written up as a change order on the spot. Based on HPT's published pricing, an added bedroom typically runs $400 to $800 + HST.
- End-of-day check-in. A short call or visit covers what got done and what happens tomorrow.
Every change, however small, should go in writing on day one. A quick written note avoids confusion at the final walkthrough and keeps the invoice matching the work. Homeowners who work from home should tell the crew lead which room they need quiet in, so the crew can schedule that space for later in the week. Our painting FAQ page covers more questions homeowners ask before a crew arrives.
How Day One Changes for Condos, Exteriors, and Short Jobs
Day one changes for condos, exteriors, and one- or two-day jobs because building rules, weather, and compressed schedules each shift the order of work. The walkthrough stays the same in every case. What changes is the setup and what the crew tackles first.
| Project Type | Day One Focus | Extra Step Before Work Starts |
|---|---|---|
| House interior | Walkthrough, protection, patching, and sanding | Furniture moved and covered room by room |
| Condo or apartment | Elevator booking plus hallway and unit protection | Certificate of insurance filed with property management |
| Exterior | Weather and surface temperature check, washing, and scraping | Plants covered and ladders placed away from garden beds |
| Kitchen cabinets | Doors and drawers removed, labelled, and taken to the spray shop | Kitchen masked off for on-site framework |
| One- or two-day job | Prep and first coat on the same day | Colour choices confirmed the day before |
Condo and apartment painting in Toronto adds a layer of building rules to day one. Most property managers set elevator booking windows, quiet hours, and insurance paperwork requirements before a crew can start. Our office handles that paperwork ahead of time. The crew then arrives with the elevator booked and the certificate already on file.
On an exterior painting project, weather drives day one. The crew checks the forecast and measures surface temperature against the product's data sheet before any coating goes on. Day one on an exterior usually means washing, scraping loose paint, and covering plants, walkways, and windows. Scaffold and ladder placement also gets planned around garden beds and downspouts.
Kitchen cabinet painting runs on its own schedule. Based on HPT's own process, about 90% of the cabinet spraying work happens outside your home, so day one focuses on removing, labelling, and transporting doors and drawers. The frames stay in place and get masked and prepped on site.
On a one- or two-day job, the crew compresses everything into a tight window. Protection, prep, and a first coat can all happen before the end of the first day. That means colour choices need to be final before the crew arrives, since there is no buffer for a change.
Painters' First Day FAQs
You need to be home for the opening walkthrough, but not for the whole day. Once scope, colours, and existing conditions are signed off, most homeowners head to work and stay reachable by phone. Leave a key or alarm code with the crew lead if you plan to be out when they finish.
A day-one walkthrough takes about 15 to 30 minutes for a three- or four-room interior, based on HPT's typical projects. Whole-house interiors and exteriors can run close to an hour because there are more surfaces to review. Time spent here saves far more time at the final walkthrough.
Painters usually start prep on day one, and finish coats typically begin on day two for multi-day jobs. Ceilings, closets, and rooms with little repair work sometimes get a first coat by the afternoon. One- or two-day jobs are the exception, since prep and painting happen back to back.
You can change a colour on day one as long as the crew has not tinted or applied the original paint yet. The crew lead writes the change into the work order and orders the new colour, which may push that room later in the schedule. Custom-tinted paint that is already mixed usually cannot go back to the store, so that can may appear on the invoice.
Most HPT interior projects start with two to four painters, depending on square footage and the target finish date. The crew lead stays the same from day one to the final walkthrough. Larger homes and exteriors may add painters once prep is complete.
Put away small valuables, wall art, and fragile items, and have your colour choices finalized before the crew arrives. Clear a parking spot, keep pets in a closed room, and share any alarm codes. The crew handles furniture moving, protection, and all wall prep. If anything changes before day one, reach your project manager through our contact page.
Getting Your Home Painting Project Off to a Smooth Start
A smooth start to a home painting project comes down to a clear walkthrough, careful protection, honest surface testing, and a homeowner who knows what to expect. When those four pieces are in place, the first day sets up the rest of the week. Home Painters Toronto is a family-run residential painting company serving Toronto and the GTA since 1991, founded by Brian Young, who has worked in the painting industry since 1987. Our in-house crews are WSIB-compliant, fully insured with $5M in general liability coverage, and background-checked before they step into a client's home.
Every job comes with warranty-backed work, including a lifetime warranty on interior painting and a 3-year warranty on exterior painting. You can read what past clients say about our process in our client reviews, or see why Toronto homeowners choose Home Painters Toronto. Both show how day one plays out on real homes across the GTA.

Ready to book a crew that treats day one seriously? We offer fast, free quotes and warranty-backed work across Toronto and the GTA, with same-day estimates available seven days a week.
Get a Free Estimate