
Window caulking may seem like a small maintenance task, but it plays an important role in protecting your home’s exterior. When caulking around windows begins to crack, shrink, or pull away, moisture can get into the gaps around trim and frames.
That can lead to paint failure, wood deterioration, and avoidable exterior repair work over time.
Many homeowners start searching for how to do window caulking when they notice gaps around exterior windows or peeling paint near the trim. In some cases, re-caulking is a simple maintenance step. In others, failed caulking is a sign that the surrounding trim or wood needs more attention before repainting.
For homes in Toronto and the GTA, where windows are exposed to rain, humidity, and freeze-thaw cycles, keeping these joints sealed properly is an important part of exterior upkeep.
If your windows have cracked caulking, peeling trim paint, or visible gaps, learn more about professional exterior painting Toronto services to see how proper prep protects window frames and surrounding trim.
Why Window Caulking Matters
Window caulking helps seal the joints where window trim meets siding, masonry, or other exterior surfaces.
When that seal is intact, it helps limit moisture intrusion and supports the performance of the surrounding paint system. When the seal fails, water can work its way into vulnerable areas and begin breaking down wood, trim, and coatings.
This is one reason professional painters pay close attention to caulking during exterior prep. Caulking is not just a finishing detail. It is part of the protection system for the home.
Signs Old Window Caulking Needs To Be Replaced
Window caulking does not last forever. Exposure to sun, rain, and temperature changes causes it to age over time.
Common signs that caulking should be replaced include:
- visible cracks in the caulking line
- gaps where the caulking has pulled away
- hardened or brittle material
- peeling paint near the window joints
- evidence of moisture wear around trim
If these signs are present, simply painting over the old caulking usually will not solve the problem. Failing caulking should be removed and replaced so the joint can seal properly again.
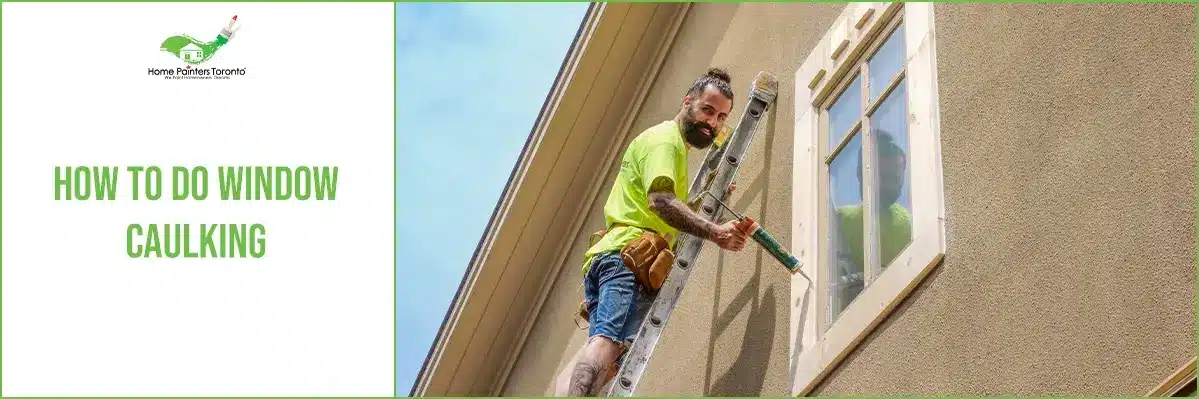
How to Do Window Caulking Step by Step
Proper window caulking starts with preparation. Applying fresh caulking over dirty or failing material usually leads to a weak result.
Remove failing old caulking
Old caulking that is cracked, loose, or separating should be removed before new material is applied.
This gives the new bead a better surface to bond to and helps create a cleaner, more effective seal. Applying new caulking over failed material often causes the same problem to return quickly.
Clean and dry the area
Once the old material is removed, the joint should be cleaned and allowed to dry.
Dirt, dust, and moisture can interfere with adhesion. A clean surface helps the new caulking bond more reliably and perform better over time.
If the surrounding trim shows signs of damage, homeowners may also need exterior wood repair and carpentry before repainting the area.
Apply the new caulking bead carefully
The caulking should be applied in a controlled, consistent bead along the joint.
The goal is to seal the gap cleanly without overfilling or leaving voids. A messy application can look poor and may not provide a proper seal.
Window trim areas are visible, so neatness matters both for protection and appearance.
Tool the bead for a clean seal
After application, the bead should be smoothed so it seals the joint evenly and leaves a clean line.
This helps improve both the look and the function of the caulking. Proper tooling also helps ensure the caulking makes good contact with both sides of the joint.
Common Mistakes When Caulking Around Windows
A few common mistakes cause window caulking to fail early.
These include:
- applying new caulking over loose old material
- caulking dirty or damp surfaces
- leaving gaps in the bead
- applying too much caulking and creating a messy finish
- ignoring wood damage or failed trim underneath
Caulking works best when the surrounding surfaces are stable and properly prepared. If the joint is moving excessively or the trim is already deteriorating, caulking alone may not be enough.
Why Window Caulking Is Important Before Exterior Painting
Window caulking is often part of a larger exterior preparation process.
Before trim and surrounding surfaces are painted, the joints around windows should be checked carefully. Open gaps and failed caulking can allow moisture in behind the paint system, which reduces the life of the finish.
This is why caulking is commonly included as part of professional window frame painting and broader exterior repainting work.
For homeowners planning a full repaint, proper caulking also supports better results from Toronto house painters because it improves both appearance and surface protection.
When Window Caulking Is Better Left to Professionals
Some window caulking jobs are simple. Others are part of a more complex exterior maintenance issue.
Professional help is often worthwhile when:
- the home has multiple windows with widespread caulking failure
- the trim shows signs of rot or moisture damage
- the window areas are difficult to access
- caulking is being done as part of a full exterior painting project
In these situations, caulking is usually only one step in a larger repair and repainting process.
If your home has aging trim, widespread caulking failure, or multiple exterior surfaces needing work, explore professional house painting Toronto services to handle the prep and repainting together.
How To Maintain Exterior Window Caulking
Exterior window caulking should be checked regularly rather than ignored until major problems appear.
Homeowners should inspect window trim and joints at least seasonally for:
- new cracks
- shrinkage
- separation at the edges
- peeling paint near joints
- visible water wear around trim
Catching these issues early can help prevent more expensive repairs later.
A good maintenance routine also supports the longevity of exterior paint and trim throughout the home.
Frequently Asked Questions About Window Caulking
How do you know when window caulking needs to be replaced?
If the caulking is cracked, pulling away, hardened, or leaving visible gaps, it is usually time to replace it.
Should old caulking be removed before applying new caulking?
In most cases, yes. New caulking bonds better when failing material is removed and the joint is cleaned properly first.
Can you paint over window caulking?
Yes, in many cases exterior caulking around windows is part of the preparation before repainting trim. The caulking should be properly applied and ready for the coating system being used.
Is cracked window caulking a problem?
Yes. Cracked caulking can allow moisture into vulnerable joints around windows, which may lead to paint failure or trim damage over time.
Is window caulking part of exterior painting prep?
Yes. Professional exterior painting prep often includes inspecting and replacing failed caulking around windows and trim before painting begins.
How To Do Window Caulking
If your exterior windows have cracked joints, failing trim paint, or signs of moisture wear, addressing the caulking early can help prevent bigger problems later.
Learn more about professional exterior painting Toronto services and how proper prep, repairs, and caulking help protect your home’s exterior.
Call 416.494.9095 or email [email protected] for a FREE quote. And don’t forget to check us out on our social media channels below!