

Every home painting protection process in Toronto and across the GTA starts before a single can of paint opens. Homeowners in Mississauga, Etobicoke, and Markham often ask what actually happens to their floors, furniture, and gardens once a crew arrives on site. A professional painting company treats protection as a scheduled part of the job, not a rushed afterthought squeezed between coats. Drop cloths, painter's tape, poly sheeting, and plant covers each have a specific role, and skipping any one of them risks paint transfer, scuffed hardwood, or crushed landscaping. This guide explains how a trained crew sets up, protects, and breaks down a job site on interior and exterior projects, so homeowners know what to expect before the painters arrive and why Home Painters Toronto includes this process in every estimate.
A professional home painting protection process covers floors, furniture, HVAC vents, and landscaping with drop cloths, taped-down poly sheeting, and painter's tape before any prep work starts. Crews mask trim and fixtures, cover garden beds, and seal off vents so dust, drips, and overspray never reach surfaces not scheduled for painting.
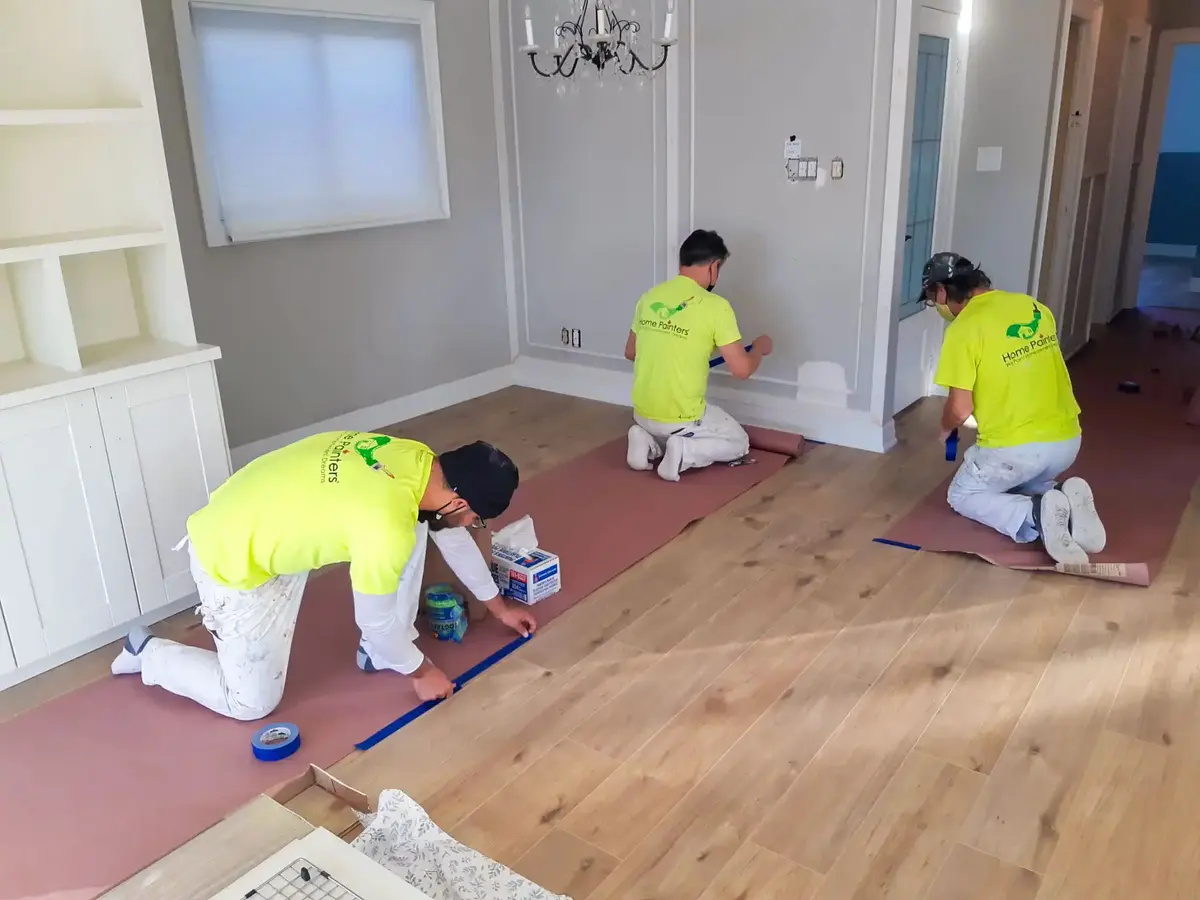
Protection is a scheduled part of the job, not a rushed afterthought
The Home Painting Protection Process, Step by Step
The home painting protection process follows five steps in a set order: a walkthrough, furniture staging, floor covering, fixture masking, and a final check before any paint opens. Skipping a step, even on a small job, is how drips end up on baseboards or scuff marks appear on hardwood. The order matters as much as the materials, since taping trim before the floor is covered often means kneeling on an unprotected surface to finish the job.
- Pre-project walkthrough. The crew lead and homeowner confirm which rooms or elevations are being painted, note fragile items, and flag anything needing special handling.
- Furniture staging. Movable pieces get grouped in the centre of the room and covered with plastic sheeting or moving blankets, with corner blocks lifting legs off the freshly protected floor.
- Floor covering. Canvas drop cloths go down over rosin paper or ram board in walkways and work zones, taped at the seams so they cannot slide underfoot.
- Fixture and trim masking. Painter's tape goes on baseboards, window casings, and door trim; switch plates and outlet covers come off, and light fixtures get bagged.
- Final site check. A project manager walks the space again before paint opens, confirming every surface outside the scope stays covered.
| Area | Protection Method |
|---|---|
| Hardwood and tile floors | Canvas drop cloths over rosin paper |
| Carpet | Taped plastic sheeting at the perimeter |
| Furniture | Moving blankets or plastic wrap, grouped centrally |
| HVAC vents | Grilles removed or covered with taped plastic |
| Landscaping | Breathable fabric covers and plywood walk boards |
Interior and exterior projects share the same five steps, but the materials shift with the setting. Interior work leans on canvas, rosin paper, and static bags for fixtures, while exterior work relies more on breathable fabric, plywood, and tarps that hold up outdoors for days at a time. A crew running both scopes on one property, such as a full repaint with matching deck work, sets up both systems side by side instead of treating protection as a single generic step.
The Home Painting Protection Process for Multi-Day Projects
A home painting protection process on a multi-day project has to hold up overnight, not only during working hours. Crews re-secure drop cloths and tape each evening, cover open paint trays, and check that exterior tarps and ladder placements are stable before leaving. On exterior jobs spanning several days, plant covers stay on overnight when temperatures drop close to freezing, and ladders or scaffolding get roped off from foot traffic.
How Long Does Floor and Furniture Protection Take to Set Up?
Floor and furniture protection typically takes 30 to 60 minutes to set up in an average three-bedroom home before prep work starts. Larger homes or full floor projects can take longer, and crews build this time into the schedule instead of rushing it. A poorly taped drop cloth causes more cleanup later than the time it would have taken to lay it properly.
Protecting Floors and Furniture During Interior Painting
Interior crews protect floors with canvas drop cloths over rosin paper and protect furniture by grouping it in the centre of the room under moving blankets or plastic sheeting. The combination stops both drips and dust from reaching finished surfaces, and it works the same way whether a crew is painting one bedroom or an entire main floor. Crews build this coverage before touching a paint tray, not partway through the job, because a floor left exposed for even one coat is a floor that can end up needing repair. The same habits apply across every interior painting project, big or small.
- Canvas drop cloths absorb drips instead of letting paint pool and spread the way plastic sheeting does, which is why crews use canvas in active work zones and plastic for longer-term coverage.
- Crews tape down drop cloth seams instead of simply overlapping them, so the cloths cannot bunch up and become a trip hazard.
- Furniture legs sit on felt pads or small wood blocks to prevent scratches on hardwood while the floor underneath stays protected.
- Crews roll up area rugs and move them out of the room instead of covering them in place, since a rolled rug traps far less dust and debris.
- Crews run a strip of painter's tape along baseboards and casings before cutting in starts, protecting finished trim that is not part of the current interior residential painting scope.
Protecting HVAC Vents and Electrical Fixtures
Crews protect HVAC vents and electrical fixtures by shutting off the forced air system during sanding, covering supply and return grilles with taped plastic, and removing switch plates and outlet covers before cutting in begins. This step gets missed more often than floor protection, mostly because dust travel is invisible until it settles on a finished surface days later. A five-minute check of every vent and fixture in the work zone prevents a much longer cleanup once the job wraps up.
- Shutting off the HVAC system during drywall sanding or scraping stops fine dust from circulating through the ductwork and settling into rooms that were already finished.
- Crews seal return air grilles first, since they pull the most airborne dust into the system.
- Crews bag recessed lighting and ceiling fixtures with static cling plastic instead of taping them directly, which avoids adhesive residue on the fixture itself.
- Crews remove switch plates and outlet covers entirely instead of taping over them, so the paint line sits clean against the wall once the hardware goes back on.
- Crews flag any exposed wiring or open junction boxes for an electrician before painting continues, and route drywall patching around fixtures through the same drywall repair and installation process already scheduled on site.
- Crews give exterior GFCI outlets, doorbell cameras, and pot light trim rings the same treatment outdoors, since a taped-over camera lens or a painted-shut GFCI reset button creates a callback that is easy to avoid.
Protecting Landscaping, Walkways, and Windows During Exterior Painting
Exterior crews protect landscaping, walkways, and windows with breathable fabric plant covers, plywood or rubber walk boards, and taped window film, all set up before scraping or pressure washing starts. Exterior protection has to survive wind, rain, and multiple days on site, so the materials tend to be heavier duty than what a crew uses indoors. These habits apply to every exterior painting project regardless of home size.
- Crews use breathable fabric covers over garden beds and shrubs instead of plastic sheeting, because plastic traps heat and moisture against foliage and can scorch plants on a sunny day.
- Crews lay plywood or rubber walk boards across garden beds anywhere a ladder or scaffold base needs to sit, spreading the load so soil and root zones do not compact.
- Crews lay tarps under the entire work zone during scraping and sanding to catch paint chips, which matters most on homes built before 1990 where old coatings may contain lead.
- Crews mask window glass with tape and film before spraying or brushing near frames, and bag door hardware the same way.
- Crews keep pressure washing angles low and controlled near siding seams and window flashing to avoid forcing water behind the cladding, a detail that matters as much on exterior residential house painting as it does on brick.
Homes getting exterior brick staining at the same time need masking extended to any adjacent stone or stucco that is not part of the stain scope, since overspray on an unrelated surface is far harder to correct on masonry than on siding. Crews walk the full perimeter before mixing any stain to confirm exactly where the protected zone starts and ends.
- At a recent exterior repaint in Etobicoke, our crew masked the foundation planting beds along the south wall with 6 mil poly sheeting before starting surface prep, since the homeowner had recently planted young cedars close to the house.
- We applied Benjamin Moore Aura Exterior in Low Lustre and held off on coating until the substrate read above 10°C, matching the minimum application temperature listed on the product's technical data sheet.
- The same job included deck and fence staining on a rear cedar deck, where plywood walk boards protected a newly seeded section of lawn for all three days of work.

Exterior protection has to survive wind, rain, and multiple days on site
Why Masking Materials and Mil Thickness Actually Matter
The mil thickness and adhesive rating of masking materials decide whether a home painting protection process actually holds up, because thin sheeting tears under foot traffic and low-grade tape pulls finish off trim when it comes off. Many companies mask a site with whatever plastic is cheapest, and that sheeting tears within a day of foot traffic exactly where crews walk most. A torn sheet does not just expose the floor underneath; it also stops doing its job silently, so nobody notices until a drip has already landed.
What Mil Thickness of Poly Sheeting Do Crews Actually Use?
Professional crews generally use 3 mil polyethylene sheeting for general floor and furniture coverage and step up to 6 mil sheeting for high-traffic walkways and exterior planting beds. The heavier gauge resists punctures from tools, ladder feet, and foot traffic far better than the thin plastic sold at most hardware counters. Clean release painter's tape follows the same logic: 3M's ScotchBlue Original tape is rated for 14-day clean removal without leaving residue or lifting fresh paint, which is why crews reach for a rated tape instead of a generic roll on multi-day projects.
What Happens If Something Is Accidentally Damaged
If something is accidentally damaged during a home painting project, the contractor's commercial general liability insurance is what pays for repair or replacement, not the homeowner's own policy. That coverage sits separately from WSIB, which protects workers if someone is injured on the job instead of covering property damage. Homeowners sometimes assume their own home insurance has to respond first, but a properly insured contractor's policy is designed to cover exactly this kind of accident on a job site.
WSIB coverage provides employers with legal protection if a workplace injury occurs and gives injured workers benefits and services, so a painting company that is WSIB compliant already has that side of the job covered before liability insurance ever needs to respond to a damage claim. In practice, a project manager documents the damage, gets the homeowner's sign-off on the repair plan, and either fixes the item directly or files it through the insurer, depending on the size of the claim. Home Painters Toronto carries both, and every job is fully insured and warranty-backed, so homeowners have recourse if a floor gets scratched or a window gets chipped. Homeowners can read how past projects were handled in our client reviews.
Questions to Ask About Protection Before You Book
- Ask whether floor protection is canvas, plastic, or both, and where each gets used.
- Ask what mil thickness of poly sheeting goes down in high-traffic areas.
- Ask whether the HVAC system gets shut off during sanding or scraping.
- Ask how landscaping near the work zone gets covered on exterior jobs.
- Ask to see proof of insurance and WSIB compliance before signing anything.
A company that answers these questions clearly, without vague reassurances, is one that has a real process in place. Vague answers, or a company that seems unsure of its own setup, are a signal worth taking seriously before signing a contract. Homeowners can review why homeowners choose HPT or reach out to our team before booking to compare answers between quotes.
Protection Process FAQs
Homeowners ask these home painting protection process questions before almost every project. For more everyday questions, see our full FAQ page.
No, moving furniture is part of the crew's job, not something homeowners need to handle first. Crews group and cover larger pieces themselves, though clearing small breakables from shelves ahead of time helps the walkthrough go faster.
Yes, floor protection stays down for the full length of the project, not only during active painting. Crews check and re-tape drop cloths daily until the final coat is dry and the space is ready for a walkthrough.
Exterior painters protect landscaping with breathable fabric plant covers, plywood or rubber walk boards under ladders, and tarps below the entire work zone. This setup happens before scraping, sanding, or pressure washing starts, not partway through.
If paint reaches an unprotected surface, the crew addresses it immediately with the appropriate cleaner or touch-up, and any damage beyond a simple wipe-down falls under the contractor's liability insurance. This is exactly why a properly insured company matters more than the lowest quote.
Yes, switch plates and outlet covers typically come off before cutting in near walls instead of being taped over in place. This gives a cleaner paint line and avoids adhesive residue on the fixture itself.
Removing wall art and mirrors ahead of time is helpful but not required, since crews can take these down and protect the wall underneath. Homeowners who prefer to handle sentimental or fragile pieces personally are always welcome to do so before the crew's walkthrough.
What a Reliable Home Painting Protection Process Looks Like
A reliable home painting protection process means floors, furniture, fixtures, and landscaping are covered before the first drop cloth goes down, not patched up after a mistake. A crew that plans this step the same way it plans paint colours and coat counts is a crew that treats the whole property with the same care as the walls being painted. Homeowners preparing their home for sale or simply refreshing a space benefit the same way, since the goal is always to hand back a finished project with nothing extra to clean up. The best sign of a well-run job is often what a homeowner does not have to think about afterward, from a rug that never needed cleaning to a garden bed that looks the same as it did the morning the crew arrived.
Home Painters Toronto backs every interior and exterior project with fast, free quotes and warranty-backed work, and that includes a protection process built into the estimate from day one.

Contact Home Painters Toronto to book a walkthrough and see exactly how your home gets protected before a single coat goes on.
Get a Free Estimate