
How to Refinish Your Hardwood Floors If They Have Worn Down Over Time
Refinishing hardwood floors that have worn down over time is one of the most valuable restoration investments a Toronto homeowner can make, because original hardwood in older GTA homes is often irreplaceable once the wood is gone. Home Painters Toronto, the HomeStars Best of Award 2026 winner with over 1,200 positive reviews and 37 years serving the GTA, has refinished hardwood floors across homes in North York, Etobicoke, Leaside, and Riverdale. Toronto homes built between the 1940s and 1980s commonly have original oak or pine hardwood beneath carpet, vinyl, or multiple layers of old finish. Refinishing those floors correctly restores decades of character in a surface that new flooring cannot replicate. This guide covers every element of the decision and process.
Many Toronto homes have gorgeous hardwood flooring that has been worn down, scuffed, or scratched over years of use. Refinishing restores that natural beauty and brings the floor back to the character it had when it was first installed. Some homeowners cover their hardwood flooring with carpet or vinyl; in older Toronto homes especially, it is worth lifting a corner to see what is underneath because original hardwood hidden under a later floor covering is a common discovery across East York, North York, and Etobicoke homes from the postwar era.
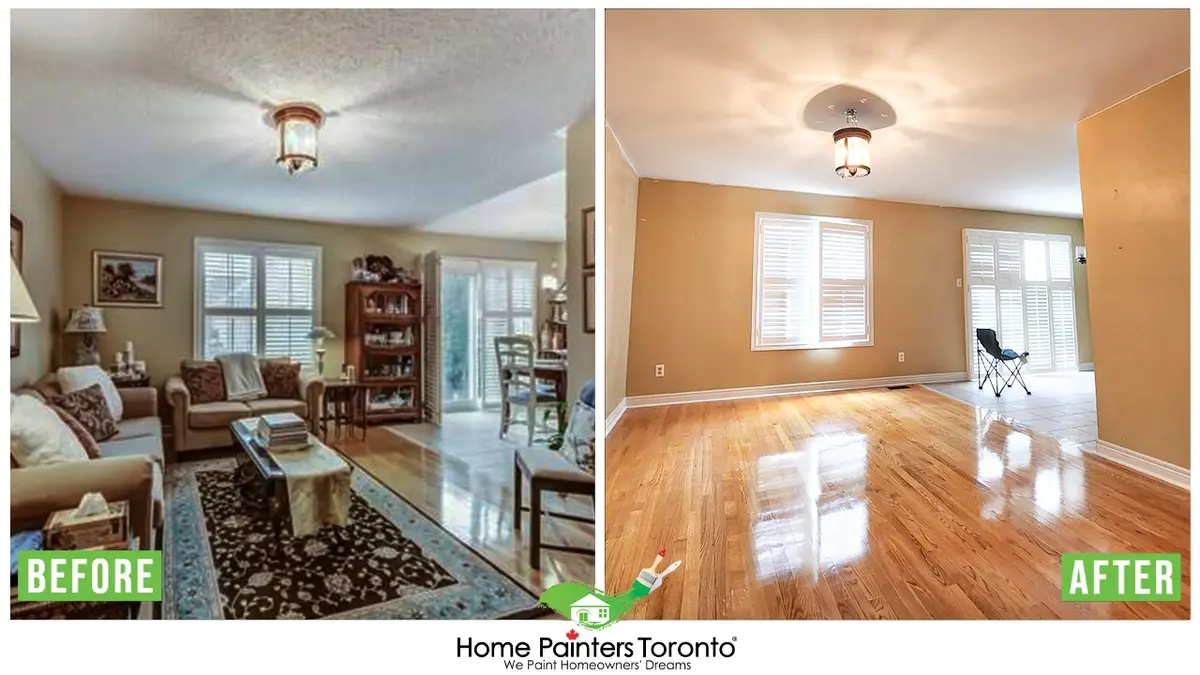
Original white oak hardwood floors in Toronto homes from the 1940s through the 1970s are typically 19 to 22 mm thick — thick enough for multiple refinishing cycles and far more character than any new flooring product can replicate.
Hardwood Floors in Toronto Homes: Why Refinishing Is Almost Always Worth It
Original hardwood floors in Toronto homes from the 1940s through the 1970s are typically solid white oak or pine planks 19 to 22 mm thick, nailed directly to the subfloor. That thickness allows the floors to be sanded and refinished multiple times over the life of the home. A floor that has been refinished twice still has significant wood remaining for further refinishing cycles, unlike engineered flooring which typically allows only one or two light sandings before the wear layer is exhausted.
Toronto's seasonal humidity is the primary cause of hardwood floor wear beyond normal foot traffic. Indoor humidity drops from 50 to 55% in summer to 25 to 30% under forced air heating in winter. According to the National Wood Flooring Association guidelines on humidity and hardwood, hardwood floors should be maintained between 35 and 55% relative humidity. Toronto homes frequently fall below this range in winter, causing seasonal gapping between boards and micro cracking in the finish that accumulates over years into the dull, worn appearance that triggers a refinishing decision.
Refinishing is cost effective compared to replacement because the raw material, the original wood, is already in place and is typically of higher quality than comparable new flooring products. Replacement requires removal, disposal, and new material costs. Refinishing restores the same floor for a fraction of the replacement cost. Our hardwood floor installation and repair service covers both new installation and full refinishing scopes across the GTA.
Refinishing Hardwood Floors: The Professional Assessment Process
Floor assessment is the critical first step that determines whether refinishing is viable or whether replacement is the correct decision. Engineered hardwood floors and floors with a laminate coating on top cannot be sanded and refinished without destroying the wear layer. Solid hardwood at least 18 mm thick is the minimum for a full sand and-refinish scope.
Gap assessment is equally important. Widening gaps between floor planks, particularly where the nail heads holding the boards are visible, indicate significant wood movement or structural issues beneath the floor that refinishing alone will not address. A professional assessment confirms the floor condition before any sanding begins. The types of house flooring guide covers the identification of different flooring types in Toronto homes.
Wood species also affects the refinishing approach. Oak and pine, the most common hardwood species in Toronto homes, sand and accept stain predictably. Maple, walnut, and mahogany are denser, harder woods that require slower sanding passes and more careful stain application to achieve an even colour without blotching. A professional confirms the species and adjusts the sanding grit sequence and stain application method accordingly.
Floor preparation before refinishing begins with removing all baseboard trim. Trim that is in good condition is carefully removed and set aside for reinstallation after the floor is completed. A utility knife scores the paint line between the trim and wall before the trim is removed with a wide blade putty knife and pry bar, which prevents wall damage and allows the trim to be reused.
Thorough floor cleaning removes all dirt, debris, and surface contaminants that would interfere with the sanding process. All protruding nail heads are identified and counter sunk approximately 6 mm below the surface with a nail set before sanding begins. Any protruding nail head that contacts a drum sander damages the sanding belt and scores a visible scratch across the floor surface.
Dust containment is essential during the sanding phase. The work area is isolated by closing all interior doors, covering HVAC vents, and sealing door gaps with plastic sheeting and tape. Hardwood floor sanding generates very fine dust particles that travel throughout the home through HVAC systems and door gaps if the area is not properly contained.
Professional hardwood floor sanding follows a progressive grit sequence that removes the old finish and levels the surface without creating deep scratch patterns that show through the new finish. The sequence begins at a coarse grit appropriate to the floor condition: 20 to 36 grit for floors with heavy damage or old polyurethane buildup, 60 grit for floors with lighter wear, and 80 grit for floors being refinished for the first time or floors in excellent underlying condition.
Each grit pass is made in the direction of the floor boards, never across the grain. An edge sander addresses the perimeter of each room where the drum sander cannot reach. Corners are addressed with a hand scraper and fine grit sandpaper. After the coarse pass, subsequent passes with 60 grit, then 80 grit, then 120 grit progressively remove the scratch pattern from the previous grit and produce the fine, uniform surface that accepts finish evenly. Each pass begins on the opposite end of the room from the previous pass to ensure uniform coverage.
Vacuuming after sanding is not optional. Fine sanding dust left on the floor surface is carried into the finish as it is applied, creating a gritty, rough texture in the cured coating that cannot be corrected without sanding back through the finish layer. An industrial grade vacuum with a soft bristle hardwood floor attachment removes the fine dust without scratching the freshly sanded surface. A tack cloth pass after vacuuming picks up any residual dust the vacuum left behind.
Finish application on refinished hardwood floors follows the wood grain direction throughout. A four inch brush cuts in along the room perimeter. A lambswool applicator or quality floor roller covers the main floor area. Both tools are applied in the direction of the wood grain with consistent pressure to avoid lap marks and uneven sheen.
The first coat of sealant or finish is allowed to dry for a minimum of 24 hours before a light buff with a power buffer removes the raised grain that appears after the first coat on freshly sanded wood. All buffing dust is vacuumed before the second coat is applied. Two coats is the minimum for a properly finished hardwood floor; three coats is the professional standard on high traffic areas and floors in open concept main floor living spaces.
Hardwood Floor Species Commonly Found in Toronto Homes: What Each Requires
| Wood Species | Common Toronto Era | Hardness (Janka Scale) | Refinishing Consideration | Stain Behaviour |
|---|---|---|---|---|
| White oak | 1940s to present; most common | 1,290 | Sands predictably; accepts stain evenly; most forgiving species to refinish | Accepts virtually any stain colour evenly; excellent candidate for colour change |
| Red oak | 1940s to 1980s; very common | 1,290 | Similar to white oak; slightly more open grain | Slight pinkish undertone when unstained; accepts stain well but red tones show through lighter stains |
| Pine (soft) | 1920s to 1950s; heritage homes | 870 | Soft; dents during sanding if too aggressive; requires lighter sanding passes | Very porous; absorbs stain unevenly without wood conditioner; blotching is common |
| Maple | 1960s to 1990s; less common | 1,450 | Very hard; drum sander dulls quickly; requires more passes | Dense, closed grain resists stain penetration; very light natural colour; difficult to stain evenly |
| Walnut | Occasional; feature rooms | 1,010 | Medium hardness; sands well; beautiful natural colour often best left unstained | Rich dark brown naturally; stain usually not needed; water based finish shows natural colour best |
| Mahogany | Rare; older heritage homes | 2,200 plus (varies) | Very hard; specialist equipment recommended | Naturally rich reddish brown; stain may clash; natural finish usually preferred |
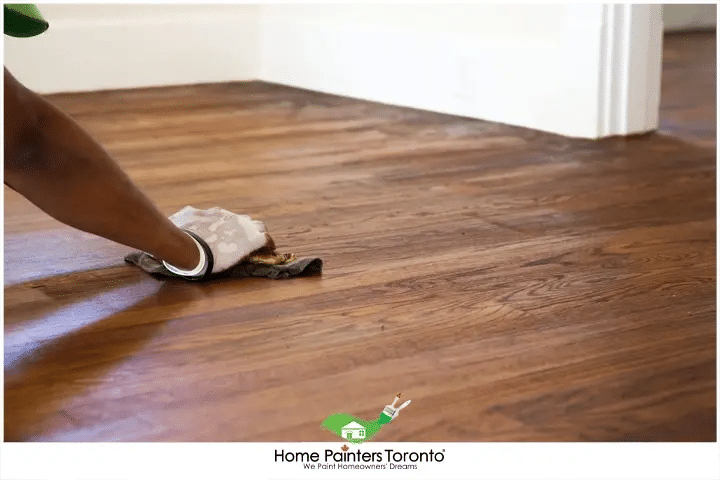
Stain applied in the direction of the grain and wiped to colour after 5 minutes of penetration — the technique that prevents lap marks and blotching on Toronto oak floors.
Hardwood Floor Resurfacing vs Refinishing: Key Differences and Best Practices
What Is Hardwood Floor Resurfacing?
Resurfacing hardwood floors involves sanding away a thin surface layer to remove scratches, stains, and surface wear, followed by applying a new finish coat. The process is less comprehensive than full refinishing because it removes less wood and does not always involve stripping the floor to bare wood. Resurfacing is appropriate for floors with superficial surface blemishes and no structural complications, and it produces a result more quickly and at a lower cost than full refinishing.
Determining whether a floor needs resurfacing depends on the type and depth of the wear and tear present. Surface level scratches, faded finish, and minor scuffs that have not penetrated through to the raw wood are typically resurfaceable without a full sand to bare wood.
What Is Hardwood Floor Refinishing?
Hardwood floor refinishing is a more comprehensive process that involves sanding down to bare wood, removing all existing stain and finish layers as well as any surface imperfections or damage that extends into the wood itself. A full refinish gives the homeowner the option to change the floor colour entirely with a new stain before the topcoat finish is applied, or to return the floor to a clear natural tone.
Full refinishing is best suited for floors with deep set stains, significant scratching, damage below the surface layer, or when a colour change is desired. It is also the correct choice when the existing finish is oil based polyurethane and the new finish will be water based, because the two products require separation by a bare wood sanding to avoid adhesion and colour compatibility issues.
Resurfacing vs Refinishing Hardwood Floors: Side-by-Side Comparison
| Factor | Resurfacing | Full Refinishing |
|---|---|---|
| Sanding depth | Light sanding; removes minimal wood | Full sanding to bare wood; heavier material removal |
| Old finish removed? | Partially or not fully removed | Completely removed |
| Colour change possible? | No; existing stain tone remains | Yes; new stain applied to bare wood |
| Suitable damage level | Surface scratches, faded sheen, light scuffs | Deep scratches, old stains, colour change, heavy wear |
| Time required | 1 to 2 days for standard room | 2 to 4 days depending on size and species |
| Cost comparison | Lower; less labour and material | Higher; full sand, stain, and finish scope |
| Times floor can be done | Same limit as refinishing; depends on remaining wood thickness | Solid hardwood 18 mm thick can typically be refinished 3 to 5 times over its lifetime |
| Toronto seasonal gap repair | Does not address gaps | Some gap filling is possible at bare wood stage before staining |
Choosing the Right Finish When Refinishing Hardwood Floors in Toronto
Finish selection determines the appearance, durability, and maintenance requirements of the refinished floor. Toronto homes have specific considerations that affect the choice: the humidity cycling that causes wood movement, the level of foot traffic in open concept main floor living areas, and the aesthetic preference for the sheen level.
| Finish Type | Appearance | Durability | Cure Time | Toronto Notes |
|---|---|---|---|---|
| Oil based polyurethane | Warm amber tone; deepens colour naturally | Excellent; hard film; good scratch resistance | 7 to 14 days full cure; 24 to 48 hours between coats | Classic choice for Toronto heritage homes; amber tone complements oak grain; strong VOCs require ventilation |
| Water based polyurethane | Clear; preserves natural wood colour | Very good; slightly less hard than oil based | 3 to 5 days full cure; 4 to 6 hours between coats | Faster recoat; low VOC; good for homes with children; preserves lighter wood tones like maple |
| Oil based polyurethane (satin or matte) | Warm, low sheen | Excellent | 7 to 14 days full cure | Most requested finish in Toronto renovation projects; hides daily wear marks better than gloss |
| Penetrating oil finish (Rubio Monocoat, Osmo) | Natural, matte; soaks into wood rather than film on top | Moderate; must be maintained and reapplied spot by spot | 24 to 48 hours before light use | Growing Toronto trend; spot repairable without full resanding; lower build film |
| Water based stain plus water based polyurethane | Wide colour range; clear protective film | Very good | 3 to 5 days full cure | Best for colour change projects in Toronto; faster turnaround for occupied homes |
Warning Signs That Hardwood Floors Need Refinishing in Toronto
Most hardwood floors give clear signals that refinishing is needed before the damage reaches a level that requires full replacement. Recognising these signs early produces a more affordable refinishing scope with better results than waiting until the wood itself is compromised.
| Warning Sign | What It Means | Urgency |
|---|---|---|
| Grey or black discolouration in scratches | Water has penetrated the finish and entered the wood; early moisture damage | High: refinish before the moisture damage spreads deeper into the wood |
| Finish peeling or flaking in patches | Finish adhesion has failed; often caused by incompatible product layers | High: peeling continues and worsens; refinish required |
| Dull, flat appearance that does not respond to cleaning or polishing | Finish is fully worn through in high traffic areas; wood is unprotected | Medium to high: exposed wood is vulnerable to staining and moisture |
| Scratches visible through the finish but not into the bare wood | Normal wear; finish layer is thinning | Medium: ideal time to refinish before scratches reach bare wood |
| Visible colour variation or patchy appearance across the floor | Uneven finish wear; some areas unprotected | Medium: refinish on schedule; patchy wear accelerates further damage in exposed areas |
| Gaps between boards widening seasonally | Normal seasonal movement; boards expanding and contracting with humidity | Low: normal for Toronto; can be filled at bare wood stage during refinishing |
Cost of Refinishing Hardwood Floors in Toronto in 2026
Hardwood floor refinishing costs in Toronto depend on the square footage, the condition of the existing finish, the wood species, whether staining is included, and the finish product specified. Home Painters Toronto is WSIB compliant, fully insured to $5 million general liability, and all interior work is backed by a lifetime warranty. All prices below are in CAD and exclude HST.
| Scope | Estimated Cost (CAD) | Notes |
|---|---|---|
| Hardwood floor refinishing (standard condition) | $3 – $5 per sq ft | Sanding, vacuuming, and two coats of clear finish; no stain |
| Hardwood floor refinishing with stain | $4 – $7 per sq ft | Sanding, stain application, and two topcoats; colour change included |
| Hardwood floor resurfacing (light sanding only) | $2 – $4 per sq ft | Light sanding; one or two topcoats; no colour change possible |
| Filling seasonal gaps before finishing | $0.50 – $1.50 per sq ft | Optional; improves appearance; included in some full refinishing quotes |
| Minimum project fee | $800 – $1,500 | Regardless of scope; covers small rooms and single room projects |
| Full hardwood floor installation (new or replacement) | Quoted by scope | See our hardwood floor installation service for details |
For a full breakdown of interior renovation costs, see our interior painting and flooring cost guide.
Hardwood Floor Installation and Refinishing Services in Toronto
Refinishing hardwood floors is a labour intensive, multi stage project that requires the correct equipment, grit sequence, and finish application technique to produce a result that lasts. At Home Painters Toronto, we have an entire handyman and flooring crew with years of experience refinishing hardwood floors across the GTA. Our hardwood floor installation and repair service handles the full scope from initial floor assessment through final finish coat. If it is time to restore your floors, our team would love to bring out the beauty in your hardwood.
Real Project: Hardwood Floor Refinishing in a Leaside Home
Leaside 1952 Detached: Original White Oak Under Carpet, First-Time Refinish, Minwax Provincial Stain and Satin Polyurethane
A homeowner in Leaside contacted Home Painters Toronto after discovering original white oak hardwood beneath the wall to-wall carpet in their 1952 detached home. The floor had been covered since at least the 1980s based on the carpet installation evidence. The oak boards were 22 mm solid hardwood in excellent structural condition with no rot, no significant gaps, and no previous refinishing history, meaning the full 22 mm of wood was available for sanding.
Our team began with a full floor assessment and confirmed all nail heads were counter sunk before sanding. The first sanding pass used 36 grit to remove the original finish and level minor surface irregularities. Subsequent passes progressed to 60 grit, then 80 grit, then 120 grit for the final surface. An edge sander addressed all room perimeters. After vacuuming and a tack cloth pass, the homeowner selected a medium walnut stain (Minwax Provincial 211) to complement the existing interior trim colour.
Stain was applied with a lambswool applicator in the direction of the grain and wiped to the correct tone after 5 minutes of penetration time. The stain was allowed to dry for 24 hours before two coats of oil based polyurethane in a satin finish were applied, with a power buffer pass and vacuuming between coats. Total project time was three days from first sanding pass to final coat. The floor was cleared for light furniture placement at 48 hours and returned to full use at seven days.
Home Painters Toronto is WSIB compliant, fully insured to $5 million general liability, and all interior work is backed by a lifetime warranty. For completed projects, visit our Toronto painting and flooring projects page. Same day free estimates are available seven days a week across the GTA.
Conclusion
Refinishing hardwood floors is one of the most rewarding restoration projects in a Toronto home, producing results that feel brand new while preserving the original character of wood that cannot be replicated with new materials. The correct assessment, sanding sequence, stain choice, and finish product selection determine how long the results last and how close to perfect they look.
Frequently Asked Questions About Refinishing Hardwood Floors
Solid hardwood floors at least 18 mm thick can typically be refinished. Engineered hardwood floors have a thin wear layer, usually 3 to 6 mm, and can only withstand light sanding or resurfacing before the wear layer is exhausted. Laminate flooring cannot be refinished at all. A professional assessment confirms the floor type and remaining thickness before any sanding begins. Floors with widening gaps where nail heads are visible may have structural issues that refinishing alone will not address.
Solid hardwood floors in Toronto homes can typically be refinished three to five times over their lifetime, depending on the original thickness and how aggressively each refinishing removes wood. A 22 mm solid oak floor that loses approximately 1.5 mm per refinishing can be sanded four to five times before the boards are too thin to sand safely above the nail heads. Annual inspections and early refinishing on schedule produce thinner sanding passes and extend the number of refinishing cycles available.
Refinishing involves sanding down to bare wood, removing all existing stain and finish, and applying a full new stain and finish sequence. Resurfacing is a lighter process that removes only the surface finish layer without necessarily reaching bare wood, producing a freshened appearance at a lower cost and in less time. Refinishing allows colour changes and addresses deeper damage; resurfacing is suitable for floors with surface wear only and no colour change desired.
Most single room hardwood floor refinishing projects take two to three days for a professional crew: one day for sanding and dust removal, one day for staining and first finish coat, and one day for the second finish coat. Larger multi room scopes take three to five days. The floor is safe for light foot traffic at 24 to 48 hours after the final coat, and ready for furniture replacement after full cure at five to seven days for oil based products.
Oil based polyurethane in a satin sheen is the most requested finish for Toronto homes because its warm amber tone enhances the natural grain of oak, the most common hardwood species in GTA homes, and its hard film resists the foot traffic common in open concept main floors. Water based polyurethane is the better choice for maple floors, for homeowners who want to preserve a lighter natural wood tone, and for households that need a faster cure time due to young children or pets. Penetrating oil finishes are growing in popularity for their natural appearance and spot repairability.
Standard hardwood floor refinishing without stain costs between $3 and $5 per square foot in Toronto. Adding stain for a colour change brings the cost to $4 to $7 per square foot. Resurfacing (light sanding only) runs $2 to $4 per square foot. A minimum project fee of $800 to $1,500 applies regardless of scope. All quotes from Home Painters Toronto are free and provided same day. Contact our team to schedule an assessment.
More Helpful Blogs Related to Hardwood Floor Refinishing
Ready to Refinish Your Hardwood Floors in Toronto?
Home Painters Toronto is the HomeStars Best of Award 2026 winner with a lifetime warranty on all interior work. Call 416-494-9095 or email [email protected] for a FREE same-day estimate.