
April, 2025
Interior House Painting Toronto Project
Davisville Village
Project Overview:
How We Completed This Interior House Painting Job
The client reached out for interior house painting services after completing some restoration work in other parts of the home. Several rooms still needed updating, and they wanted the new paint to blend with areas that were already finished. This meant matching colours carefully and keeping the prep consistent from room to room.
The home was already furnished and set up for daily use, so the project needed to work around their space without creating too much disruption. Our focus was to refresh the areas they identified while keeping everything clean and organized.
Nearby communities such as Yonge and Eglinton, Midtown Toronto, and Mount Pleasant often face similar multi-room repainting needs, so we followed the same detailed approach for all interior residential house painting projects.
Interior House Painting
The Challenge
There were a few things that made this Davisville Village project more detailed than a basic repaint. Some rooms had fresh paint from the restoration company, while others had dents, nail holes, and older finishes that needed attention. We walked through everything with the client to make sure we were clear on what needed new paint and what didn’t.
Furniture placement created tight spots. Several pieces were large and heavy, so the team had to lift them carefully and line the floors before moving anything. The staircase pickets also stood out as an area needing extra time since each one required sanding and priming before painting.
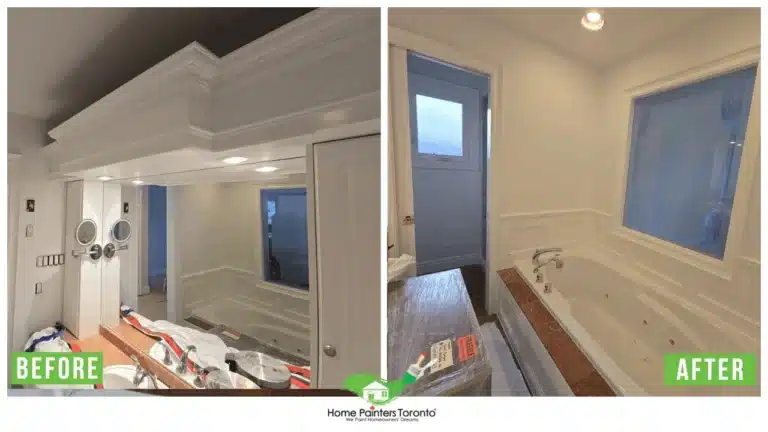
Bathrooms needed the right sheens for moisture, and the client wanted the colours to match the rest of the home. Since the house was being lived in, we planned our steps to let them move through their space while we worked.
The Result
The finished rooms looked cleaner and more unified. The new trim and moulding on the main floor tied in well with the surrounding walls. The hallway and primary bedroom on the second floor had smooth coverage, and the closets looked fresh inside and out.
The bathrooms had proper finishes for moisture, and the staircase pickets turned out even and solid after their extra prep. The client mentioned during the walkthrough that they liked how close the colours matched the earlier restoration work. They also appreciated that we kept the furniture and floors protected throughout the project.
Scope of Work: Step-by-Step Interior House Painting
Here is the full breakdown of how our Toronto interior painters completed the project.
Step 1: Setting Up and Protecting the Space
- Floors were covered with construction paper.
- Furniture and fixtures were wrapped in plastic.
- Electrical plates were taken off to keep edges clean.
- Larger items were lifted instead of dragged.
This helped keep the rooms tidy and prevented scratches or marks.
Step 2: Repairs and Prep
We filled dents and holes, sanded rough patches, and caulked where needed. Priming was done on repaired spots so the finish would look even. Most areas needed only light prep but across several rooms.
If you’re planning your own project, you can explore our guide on how to prepare for home interior painting.
Step 3: Walls and Ceilings
Walls and ceilings were painted with the selected Benjamin Moore colours. Bathrooms received different sheens based on moisture levels. We moved room by room so the client could still use parts of the home while others dried.
Step 4: Trim, Doors, and Crown Moulding
Trim and doors were painted with the chosen finish. Moulding on both floors was also updated. We checked lines and edges carefully to keep everything clean.
Step 5: Staircase Pickets
Each picket was sanded, primed, and painted with two coats. Since they’re handled often, the team checked for smoothness as they went.
Step 6: Closets and Doors
The closets and closet doors were repainted fully. Interior surfaces were prepped and painted to match the rest of the second floor.
Step 7: Touch-Ups and Cleanup
We reviewed each room, fixed small spots, reinstalled plates, removed coverings, and cleaned the floors before the final walkthrough.
BEFORE AND AFTER


Timeline & Outcome
This full interior house painting Toronto project took about a day and a half. Since the home was occupied, we planned the order of the rooms to make the process easier for the client. Prep in one room lined up naturally with drying time in another. This helped the team stay steady without rushing.
By the time we finished, the home had a more uniform look across all the updated rooms. The new finishes blended well with the restoration work, and the staircase felt refreshed. The client shared that they felt comfortable throughout the process and liked how organized everything was from start to finish.
Interior House Painting Done with Steady Planning and Clean, Consistent Results
This interior house painting Toronto project shows how steady planning and clean execution can update a home without creating major interruptions. With fresh trim, updated bathrooms, and a detailed staircase repaint, the client saw a clear improvement across all the rooms they wanted done.
You can explore our interior painting services in Toronto to learn more about similar projects or you can visit our interior painting calculator to get a clearer idea of what your project might involve.
If you’re ready to improve your own space, contact us to book a free estimate and find the best approach for your home.