

A paint sprayer for exterior house painting is the fastest way to cover large surface areas, and when used correctly, it produces a smoother, more uniform finish than brush and roller alone. But it is not a tool you can pick up and immediately use well. Overspray, uneven coverage, clogged tips, and inadequate masking are the reasons most first-time sprayer projects produce disappointing results.
This guide gives you everything you need to use an airless paint sprayer correctly on a Toronto home exterior: how the equipment works, a complete masking and prep sequence, the spraying technique that produces professional results, when to back-roll after spraying, how to clean and maintain the sprayer, and an honest assessment of when spray application is the right choice versus when brush and roller produces better or safer results.
- How an airless paint sprayer works and why it is the professional standard for exterior painting
- Spray vs. brush and roller: an honest comparison for Toronto homeowners
- What you need before you start: equipment, safety gear, and masking supplies
- How to set up and prime an airless sprayer before painting
- Masking strategy for a Toronto residential exterior
- The correct spray technique: distance, angle, speed, and overlap
- When and how to back-roll after spraying
- Paint thinning and tip selection
- Sprayer cleaning and storage
- When not to use a paint sprayer (wind, overspray risk, tight urban lots)
- What professional spray painting costs in Toronto in 2026
- A real project case study
- FAQ answers to the most common homeowner questions
Want the job done with professional spray equipment? Get a free estimate today!
Painting your house exterior with a sprayer is a great way to get the job done quickly and easily. But before you start, it's important to know what you're doing. The last thing you want is to have your carefully-painted house ruined by a rookie mistake! In this post, we'll take you through the steps of painting by using a paint sprayer for your home's exterior so that you can start feeling prepared to tackle this task yourself!
Spray painting is easier than using a roller to paint, right? Well, not always when it comes to using an airless sprayer. It will take a little patience at first but once you get the hang of it, you will find that it can be less time-consuming than using a paint roller to paint your house exterior. Because it will fill in cracks easier with one application, especially if you have a stucco exterior! So let's learn how to properly spray paint your house exterior!
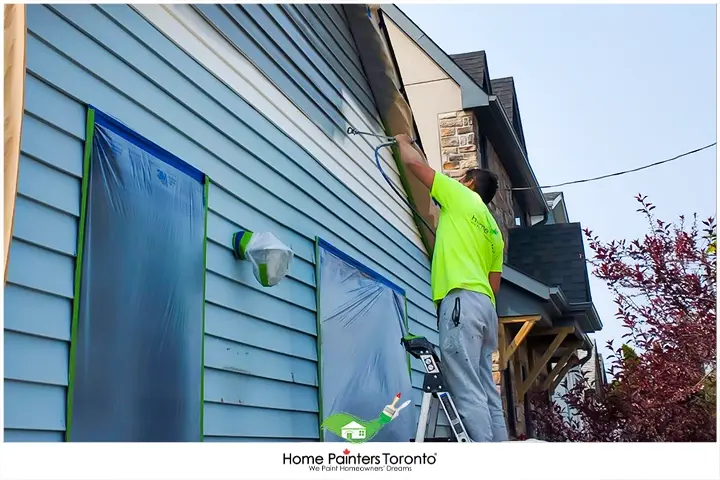
Airless spray application is the professional standard for large exterior surfaces — faster than brush and roller, with a smoother, more uniform finish when technique and masking are correct.
How an Airless Paint Sprayer Works
An airless paint sprayer pumps paint at high pressure, typically between 1,500 and 3,000 PSI, through a small tip opening. The pressure atomizes the paint into a fine spray fan without using compressed air. This is what distinguishes an airless sprayer from an HVLP (High Volume Low Pressure) sprayer or a compressed air gun. For exterior house painting, airless is the professional standard because it can handle undiluted or minimally-thinned exterior latex paints at the volume and speed needed to cover large surfaces efficiently.
The key components of an airless sprayer are the pump (which pressurizes the paint), the hose (which delivers the paint to the gun), the gun (which holds the tip and trigger), and the tip (which determines the fan width and flow rate of the spray). Understanding each of these components, particularly the tip, is what separates a spray job that goes on evenly from one with runs, holidays (missed spots), or excessive overspray.
According to Benjamin Moore's guide to painting a home exterior, proper surface preparation and the right application technique are equally important. Even the best sprayer produces poor results when the surface has not been correctly prepped or the technique is inconsistent.
Airless Sprayer vs. Brush and Roller: An Honest Comparison for Toronto Homeowners
The decision between spray and brush-and-roll for an exterior painting project is not simply "spray is faster." There are real trade-offs that affect both the quality of the result and the total time from start to finish.
| Factor | Airless Spray | Brush and Roller |
|---|---|---|
| Application speed | 4 to 8 times faster than brush; 2 to 3 times faster than roller | Slower but no masking overhead |
| Total project time | Often comparable once masking and cleanup are factored in | More consistent across a single-day project |
| Finish quality | Superior on flat surfaces and textured siding; smoother, more uniform | Good; brush marks possible on smooth surfaces |
| Masking time | Significant: every window, door, fixture, plant, and vehicle must be covered | Minimal: painter's tape on edges only |
| Overspray risk | High: paint travels well beyond the spray area on any breeze | None |
| Wind sensitivity | Cannot spray above 15 to 20 km/h | Workable in moderate wind |
| Learning curve | Moderate: takes practice to maintain correct distance and overlap | Low: most homeowners can achieve acceptable results immediately |
| Equipment cost | $300 to $500+ to purchase; $60 to $100/day to rent | Under $50 for brushes and rollers |
| Paint consumption | 25 to 30 percent more paint due to overspray waste | Minimal waste |
| Best for | Large surfaces (siding, stucco, brick), textured surfaces, large unobstructed areas | Trim, detailed work, tight urban lots with overspray risk |
The practical summary for Toronto homeowners is this: spray application is the most efficient method for large, accessible siding surfaces with good standoff distance from adjacent properties. On narrow urban lots where neighbours are close and parked cars are nearby, brush and roller is often the safer and more practical approach regardless of the time savings spray would offer.
Getting Started With Your Airless Paint Sprayer
Just hook up the paint sprayer and GO! Just kidding. You'll need to learn how to get used to it first, so try practicing on cardboard or an old door. The idea is to create an even layer of paint and know your spraying distance. Don't paint a house with a spray gun in direct sunlight because it will cause the paint to dry too fast and you'll have an uneven paint job that will end up taking a lot longer to perfect.
After you practiced on cardboard or an old door, make sure you clear the area around your house of anything you can trip on and lay down a drop cloth or tarp. Tape around any windows and trims where necessary as well. Prevent clogs by stirring the paint in the can very slowly and for a good few minutes. Whether you are planning on using an airless paint sprayer for more than one project and you buy one, or if you have decided to rent one from Home Depot or any other heavy-duty equipment rental centre, unless you're a pro already, read on for the process.
What You Need Before You Start
For a DIY exterior spray painting project, here is a complete equipment and supply checklist:
Equipment:
- Airless paint sprayer with appropriate tip for exterior latex paint (see tip selection section below)
- Extension wand for reaching eaves, soffits, and upper-storey surfaces from a lower ladder position
- Garden hose for cleanup
Safety:
- Half-face respirator with organic vapour cartridges (not just a dust mask; atomized paint particles are fine enough to penetrate standard dust masks)
- Safety goggles
- Disposable coveralls or dedicated painting clothes
- Nitrile gloves
Masking:
- Exterior-rated painter's tape (standard indoor masking tape loses adhesion in sun and outdoor humidity)
- Plastic sheeting (at minimum 3 metres wide for window coverage; wide plastic film for broad surface masking)
- Drop cloths for ground coverage
- Newspaper or paper masking for secondary coverage
- Plastic bags for light fixtures and door handles
Prep:
- 5-gallon pail and roller screen for mixing paint
- Paint strainer bags or mesh for filtering paint before it goes into the sprayer
- Pump Armor or equivalent pump storage fluid for sprayer maintenance between coats
Choosing the Right Sprayer for Exterior House Painting
For exterior house painting, an airless sprayer with a minimum 0.5 horsepower motor is the practical entry point. The Graco Magnum X5 and X7 are the most common rental and consumer purchase options at Toronto hardware stores and run approximately $300 to $450 CAD. These machines can handle undiluted premium exterior latex paints with a 515 or 517 tip without thinning.
For larger homes (two-storey or above), or for any project involving elastomeric masonry coatings (which are thicker than standard latex), a higher-capacity unit with a 0.75 to 1 horsepower motor is appropriate. These can be rented from equipment rental centres across Toronto for $60 to $100 per day.
If you are renting, book the sprayer a day ahead and pick it up the afternoon before your painting day so you can set it up and test it the evening before rather than losing painting time to setup in the morning.
Setting Up Your Airless Sprayer
All airless paint sprayers have a screen on the intake point so clear that if it hasn't already been cleaned. There should be two removable filters as well, one is located near the pump and the other should be located in the handle. Also, clean those two filters before you begin and strain your paint through a filter or mesh-type bag to remove any clogs.
Turn on the paint sprayer valve to prime your surface. Afterward, switch on the pump and turn the pressure up on the valve until the pump starts. Once paint comes out of the prime tube, move it into the paint bucket. After you prime, you can fill the hose with your exterior paint and begin spraying. Lock the trigger and let go of the pressure before you install the tip guard assembly. Turn off the power, turn the prime valve to prime and angle the spray gun to a waste pail and release pressure by pulling the trigger.
Tip Selection for Exterior House Painting
The spray tip is the single most important specification decision for exterior house painting. The tip number is a three-digit code. The first digit (multiplied by 2) tells you the fan width in inches at 30 centimetres from the surface. The last two digits tell you the orifice size in thousandths of an inch.
For standard 100% acrylic exterior latex on siding, a 515 tip is the most common professional choice. It produces a 10-inch fan at 30 centimetres and a 15-thousandths orifice that flows comfortably with standard exterior latex paints. A 517 tip produces a 10-inch fan with a slightly larger orifice, appropriate for thicker paints or faster application on large surfaces.
For elastomeric masonry coatings on brick or stucco, a 619 or 621 tip handles the thicker viscosity while producing a wide enough fan for efficient coverage on textured surfaces.
For trim work, a narrower 212 or 312 tip allows more precise application with less overspray when cutting in around window frames and door casings.
Use the minimum pressure setting that still produces a consistent, well-atomized fan. Higher pressure than necessary produces more overspray and wears tips faster. Start at the lowest setting and increase until the spray pattern is even with no tails or heavy spots at the edges.
Masking and Protecting Your Home Before Spraying
Masking is where most DIY exterior spray jobs go wrong. On a typical Toronto residential property, the volume of surfaces that need protection before an airless sprayer is operated is significant, and underestimating this step is the most common cause of post-spray cleanup work that eliminates all the time saved by spraying.
Complete Exterior Masking Checklist for Toronto Homes
Every surface that must not receive paint requires physical coverage before the first trigger pull:
Windows: Tape the frame edges with exterior painter's tape and cover the full glass area with plastic sheeting or paper masking. On a standard Toronto semi-detached with 8 to 12 windows, this step alone typically takes 30 to 45 minutes when done properly.
Doors: Cover glass panels, hardware, and any decorative elements. If the front door is not being painted, cover the full door face with plastic film.
Light fixtures and house numbers: Either mask in place with plastic bags and tape, or remove them before painting and reinstall after.
Downspouts and gutters: Tape the face of aluminum or vinyl gutters if they are not being painted. Downspouts can usually be masked with tape along the edges.
Foundation and grade: Lay drop cloths on the driveway, front path, and any garden beds immediately adjacent to the walls being painted. Even careful spray technique produces ground-level overspray.
Adjacent structures: On narrow Toronto lots where the next property is within 3 to 5 metres, inform neighbours before painting and on windy days abort the spray and switch to brush and roller. Overspray from an airless sprayer can travel 10 to 20 metres on a moderate breeze.
Vegetation: Cover shrubs and foundation plantings with plastic sheeting. Remove the sheeting after each coat to allow the plants to breathe between coats.
The professional rule of thumb cited by experienced exterior painters is that for every hour spent masking, you save eight hours of brushing. The inverse is equally true: every surface you fail to mask adds cleanup time that is typically harder than the original brushwork would have been.
How to Spray Paint Your House Exterior
Usually airless sprayers have a tip guard which works as safety to protect you from unwanted paint sprays. But you should wipe off the guard periodically while spraying with a rag and not your finger just in case. This will prevent clogs and a build-up of paint.
Sometimes you might need to back brush or back roll to get a more even coat of paint. Paint a little at a time with the air gun and then go back and spray more instead of spraying a lot of paint at once. This will prevent drying unevenly and dripping excessively. Always wear a mask and safety goggles!
The Correct Spray Technique for Exterior House Painting
This is the step where practice pays off. The most common mistakes made by first-time sprayer operators are holding the gun too far from the surface, fanning (arcing the gun rather than keeping it parallel), and not moving before triggering. Every one of these mistakes produces an uneven film that either has runs from too much paint in one spot or thin spots and holidays where coverage is inadequate.
Hold the spray gun 30 to 35 centimetres (approximately 12 to 14 inches) from the surface. This is the distance at which the 515 tip fan pattern is properly developed. Closer than 25 centimetres and the film is too thick and prone to runs. Further than 40 centimetres and you lose too much paint to overspray and the coverage is thin and spotty.
Keep the gun perpendicular to the surface and move your arm parallel to the surface, not in an arc. Arcing the gun (swinging it like a pendulum) causes the edges of each pass to receive less paint than the centre because the gun-to-surface distance increases at the extremes of the arc. This creates a variable film thickness pattern that shows as uneven sheen and colour under raking light.
Begin moving your arm before you pull the trigger, and release the trigger before you stop moving at the end of each pass. Starting and stopping the spray while the gun is stationary produces heavy spots at the beginning and end of each pass.
Overlap each spray pass by 50 percent. Aim the gun tip at the edge of the previous pass for the next pass. This ensures uniform double coverage across the full surface with no thin strips between passes.
For vertical siding: spray horizontally with the gun moving from left to right, or right to left, keeping the fan pattern vertical. Start at the top of the wall and work downward.
For horizontal lap siding (clapboard): aim the spray fan to follow the direction of the boards, spraying along their length with a slightly angled fan rather than straight horizontal.
For textured surfaces like stucco or brick: a moderate circular motion while maintaining the correct distance helps fill in the texture recesses. Back-rolling is particularly valuable on heavily textured surfaces (see below).
Back-Rolling After Spraying: When and How
Back-rolling is the practice of following immediately behind the spray application with a roller, pressing the applied paint into the surface while it is still wet. On textured surfaces (stucco, rough-sawn wood siding, brick), back-rolling ensures the paint penetrates recesses that spray alone leaves as thin spots or bridges over.
For smooth siding (vinyl, aluminum, smooth wood), back-rolling is optional and a matter of preference. The spray-only finish on smooth surfaces is typically good enough. On any surface where adhesion is a concern (weathered wood, surfaces with multiple old paint layers), back-rolling after spraying improves the mechanical bond by pressing the wet film into the surface texture.
Use a roller with a nap thickness appropriate to the surface. A 9mm (3/8 inch) nap for smooth siding, a 13 to 19mm (1/2 to 3/4 inch) nap for textured surfaces. Work in sections of approximately 1.5 to 2 metres, spraying then immediately rolling the same section, rather than spraying a full wall and then rolling back.

Back-rolling immediately after spray application on stucco and textured surfaces ensures paint penetrates into all recesses rather than bridging over them.
How Long Does It Take to Spray Paint a House Exterior?
Painting with an airless paint sprayer is a much faster process than using a brush or roller. The time it takes to paint your house exterior with an airless paint sprayer depends on how many people are helping, how big your house is, and what type of surface you're painting. It's possible to paint your house exterior in one day with an airless paint sprayer, but it will take a lot of hard work.
To give a more realistic picture of timing, here is how a professional team and a competent DIYer typically compare on a standard Toronto detached or semi-detached home exterior:
| Task | Professional Crew (2 people) | DIY Homeowner (1 person) |
|---|---|---|
| Masking all windows, doors, fixtures | 1 to 2 hours | 2 to 4 hours |
| Power washing and prep (day before) | 2 to 3 hours | 3 to 5 hours |
| Priming bare areas | 1 to 2 hours | 2 to 3 hours |
| First topcoat (spray) | 1 to 2 hours | 2 to 4 hours |
| Drying time between coats | 4 to 6 hours | 4 to 6 hours |
| Second topcoat (spray) | 1 to 2 hours | 2 to 4 hours |
| Removing masking, cleanup | 1 to 2 hours | 2 to 3 hours |
| Sprayer cleanup | 30 to 60 minutes | 45 to 90 minutes |
| Total | 1.5 to 2 days | 2 to 3 days |
The time comparison between spray and brush-and-roller for a single DIY operator often results in similar total project times because the masking and cleanup overhead of spray nearly offsets the faster application speed. The main advantages of spray over brush-and-roll for a DIY project are: superior finish quality on large flat surfaces, better coverage on textured surfaces like stucco, and less physical effort on large wall areas.
Cleaning the Paint Sprayer After Use
Cleaning the paint sprayer should not be left for another time. It should happen right after each use, or the paint will dry in the hose, tip, and pump, resulting in clogs that require significant effort to clear or render the sprayer unusable.
Step-by-Step Sprayer Cleanup After Exterior Painting
For water-based exterior latex paint (the most common case):
Pull the intake tube from the paint bucket and place it in a bucket of clean water. Run the sprayer until all paint is flushed from the pump and hose and clear water is flowing from the gun. This typically takes two to three buckets of clean water.
Remove the tip and tip guard. Clean both under running water with a brush until all paint is removed. Any paint left in the tip orifice will dry and clog it completely.
Release all pressure from the system before disassembling any components. The trigger safety must be engaged whenever the sprayer is not actively in use.
Remove and clean both filters (the intake screen and the handle filter). Paint build-up on filters causes pressure fluctuations and uneven spray patterns.
If storing for more than a few days, run Graco Pump Armor or an equivalent sprayer storage fluid through the pump after cleanup. This prevents the pump seals and intake valves from drying out and cracking in storage, which is a common cause of pump failure on rental sprayers returned without this step.
Wipe the exterior of the gun, hose, and pump body with a damp cloth. Store the hose coiled loosely (not in a tight loop that can kink the inner liner).
For oil-based paints, mineral spirits must be used for cleanup rather than water. This significantly increases cleanup complexity and makes water-based exterior latex the preferable product choice for most residential spray projects.
When NOT to Use a Paint Sprayer for Exterior House Painting
Understanding when not to spray is as important as knowing how to spray. Here are the specific conditions where spray application should be aborted and brush-and-roll substituted.
Wind above 15 to 20 km/h: Airless overspray is fine enough to travel significant distances in wind. Overspray landing on a neighbour's freshly washed car, windows, or garden furniture creates a situation that is both expensive and difficult to apologize for. Check the wind forecast before beginning any spray session. On Toronto lots where properties are close, this is a frequent constraint.
Adjacent vehicles: If cars are parked in the driveway or on the street within 15 to 20 metres of the spray area and cannot be moved, do not spray. Overspray on automotive paint requires professional cutting and polishing to remove without leaving damage.
Narrow urban lots: On many Toronto inner-city lots, the side yard gap to the neighbouring property is 1 to 2 metres. Spraying siding on the side elevation of a home on a narrow lot produces unavoidable overspray onto the neighbouring property. On these jobs, brush and roller is the appropriate method for side elevation work, while spray may still be used on the front and rear.
Preparing for rain: Do not begin spray painting if rain is forecast within 4 to 6 hours. Wet paint that gets rained on before it has skinned over is washed down the wall and must be re-applied.
Surfaces not thoroughly prepped: The sprayer amplifies every surface imperfection. Poorly prepared surfaces look worse after spray application than before. Always complete all prep steps (cleaning, scraping, filling, caulking, priming) before the sprayer comes out.
How Much Does Professional Exterior Spray Painting Cost in Toronto?
Equipment Costs for DIY Spray Painting
- Airless paint sprayer purchase (Graco Magnum X5): $300 to $400 CAD
- Airless paint sprayer rental: $60 to $100 per day from equipment rental centres across Toronto
- Extension wand: $40 to $80
- Additional spray tips (515 for siding, 312 for trim): $15 to $25 each
- Masking supplies (tape, plastic sheeting, drop cloths): $50 to $100 for a full exterior masking job
- Premium 100% acrylic exterior paint (additional 25 to 30 percent over roller consumption): $70 to $110 per 3.78L
- Pump Armor storage fluid: $15 to $20
- Total DIY spray painting equipment and materials for a standard Toronto detached home exterior: $600 to $1,400 CAD depending on whether the sprayer is rented or purchased
Professional Exterior Spray Painting Cost Estimate
Professional exterior painting using spray application in Toronto runs the same range as any exterior painting project: $2,500 to $8,500 CAD for a full residential exterior repaint, depending on home size, surface condition, scope of surfaces being painted, and whether carpentry repairs are required before painting begins.
The advantage of professional spray application is not just speed. Professional crews bring commercial-grade equipment that produces more consistent atomization than consumer sprayers, carry multiple tip sizes matched to different surfaces, have spray containment setups that protect adjacent properties, and back their work with a warranty. Home Painters Toronto backs all exterior painting with a 3-year warranty.
For a precise quote based on your specific home and its current condition, request a free estimate from Home Painters Toronto. For a full breakdown of exterior painting costs across all surfaces and project types, see our exterior painting cost guide.
Real Project: Exterior Spray Painting on a Toronto Home
Leaside Two-Storey: Stucco and Trim Repaint by Airless Spray with Back-Rolling
Here is a summary of a recent professional exterior spray painting project our team completed on a two-storey detached home in Leaside.
The situation: The homeowner wanted to repaint the full exterior of their 1950s brick and stucco home, refreshing both the painted stucco upper elevation and the trim throughout. The stucco surface had not been repainted in eleven years and showed significant chalking and several hairline cracks at the panel joints.
What the job involved: The full masking setup covered 14 windows across three elevations, both entry doors, all light fixtures, the garage door (not being painted), and the full length of the driveway and front path. All adjacent shrubs were covered with plastic sheeting. A full prep sequence including power washing, 72-hour drying time, crack filling on stucco with flexible exterior caulk, and a full coat of Sherwin-Williams Loxon Masonry Primer was completed before any topcoat application. Two coats of Sherwin-Williams Duration Exterior were applied by airless spray on all stucco surfaces using a 619 tip for the textured masonry, with immediate back-rolling after each coat to ensure full penetration into the stucco texture. All trim was sprayed separately using a 312 tip for tighter fan control at the narrower trim profiles.
The result: A fully refreshed exterior with a smooth, uniform topcoat on all stucco surfaces and clean, crisp trim lines at all window and door frames. The back-rolling on the stucco was the critical step that ensured full coverage in the texture recesses rather than the bridging effect that spray-only application can produce on rough masonry. The full project was completed in two days.
For more completed projects, visit our Toronto painting projects page.
Frequently Asked Questions About Using a Paint Sprayer for Exterior House Painting
For large, flat siding areas with good standoff distance from adjacent properties, spray application produces a superior finish faster. For trim, detailed work, and any situation where overspray risk is high (narrow lots, parked vehicles, close neighbours), brush and roller is safer and often more practical. Most professional exterior painting projects use a combination: spray for siding and masonry, brush and roller for trim and cut-in work.
Most premium 100% acrylic exterior latex paints can be sprayed without thinning when using a properly sized tip (515 or 517 for standard latex) and an airless sprayer with sufficient pump capacity. Check the paint manufacturer's product data sheet for spray application guidance. Some thicker formulations (elastomeric masonry coatings) may recommend 5 to 10 percent thinning for spray application. Never thin exterior latex paint more than 10 percent by volume unless specifically directed by the manufacturer's technical data sheet.
A 515 or 517 tip is the standard choice for most 100% acrylic exterior latex paints on siding surfaces. For elastomeric masonry coatings on brick or stucco, a 619 or 621 tip handles the higher viscosity. For trim work, a 212 or 312 tip allows better control with less overspray on narrow surfaces. Always match the tip to the paint manufacturer's spray application recommendation, which is typically found on the product data sheet or the paint can label.
Runs are caused by applying too much paint to one area, which happens when the gun is held too close to the surface, moved too slowly, or triggered while stationary. Maintain 30 to 35 centimetres from the surface, move at a consistent pace (approximately 30 to 40 centimetres per second), keep the gun perpendicular to the surface (no arcing), and always start moving before triggering. If a run appears, back-roll the wet section immediately before the paint skins over.
The ideal conditions are temperatures between 15 and 25 degrees Celsius, relative humidity below 70 percent, overnight lows above 10 degrees Celsius for the 48 hours following application, no rain forecast within 24 to 48 hours, and wind below 15 km/h. The critical condition unique to spray application is the wind limit. Even wind that seems mild can carry overspray significant distances. In Toronto, May through early June and September through early October provide the most consistent combination of appropriate temperature, humidity, and calm conditions. For a complete seasonal timing guide, see our best time for exterior house painting guide.
For water-based exterior latex: flush the pump, hose, and gun with clean water until the water runs clear (typically requires two to three buckets), remove and clean the tip and filters under running water, release all pressure before disassembly, and run Pump Armor through the pump before storage. Never leave water-based paint to dry in the sprayer. Even a few hours of drying time can clog the tip and filters, and overnight drying in the hose can render the hose unusable.
Painting your house exterior with a sprayer is a great way to get a professional-looking result quickly, but it rewards preparation, practice, and patience more than raw speed. If the process sounds like more time and complexity than you want to take on, Home Painters Toronto has been applying professional spray finishes to Toronto and GTA homes since 1987.
More Interesting Blogs Related to How to Paint Your House Exterior With a Sprayer
Want a Professional Spray Finish on Your Toronto Home?
Home Painters Toronto has been applying professional spray finishes to Toronto and GTA homes since 1987. Call 416-494-9095 or email [email protected] for a FREE quote.