
Painting garage walls is one of the most impactful interior upgrades a Toronto homeowner can make, transforming a dingy, utilitarian space into something clean, bright, and functional. But garage walls are a different kind of challenge from interior living space walls. They accumulate grease, oil, dust, exhaust residue, and moisture in ways that standard household cleaning does not address, and if those contaminants are not removed before painting, the paint will not bond and will peel within months.
This guide gives you everything you need to clean, prep, and paint garage walls correctly, whether they are drywall, concrete block, poured concrete, or bare wood framing. We cover the cleaning agents and tools for each surface type, the repair steps before priming, what primer to use on each surface, how to apply the topcoat for the best result, colour and finish choices, and what professional garage wall painting costs in Toronto in 2026.
- Why cleaning garage walls before painting matters more than in other rooms
- What types of wall surfaces are found in Toronto garages and how they differ
- Step-by-step cleaning sequence: dust, degrease, TSP wash, dry
- How to repair holes, cracks, and damaged areas before priming
- Which primer to use for each garage wall surface type
- How to paint garage walls: technique, order, and coats
- Best paint choices for garage walls: product and finish recommendations
- Colour ideas for garage walls that work in Toronto homes
- DIY vs. professional: what each approach realistically involves
- What garage wall painting costs in Toronto in 2026
- A real project case study
- FAQ answers to the most common homeowner questions
Want this handled professionally? Get a free quote for residential painting in Toronto.
Before you dive deep into painting unfinished garage walls, it's essential to have clean and primer-ready walls. Proper cleaning eliminates oils, grime, or other residues that may interfere with the paint's adherence, ensuring your hard work results in a stunning finish. So let us journey through the process of cleaning your garage walls.
Cleaning your walls is always a huge part of the preparation before painting because any debris and dirt left on your wall will reduce the quality of your paint job and its lifespan. When you spend the money to make home improvements, you want to make sure you're doing it right so it's worth your time and money, and you're not stuck repainting in a year because of the deterioration because you failed to prep. Here's a step-by-step guide to cleaning, repairing and painting your garage attached to your home.
Thorough cleaning — dust removal, degreasing, and a TSP wash — is the step that determines whether garage wall paint bonds and lasts or peels within months.
What Type of Garage Walls Do You Have? This Changes Everything
Toronto garages are built in several different ways, and the wall surface type determines the cleaning agents you use, the primer you need, and the paint product that will last. Identify your wall type before gathering supplies.
| Wall Type | Common In | Cleaning Approach | Primer Required |
|---|---|---|---|
| Drywall (finished, with tape and compound) | Newer attached garages, fully drywalled detached garages | Mild detergent or TSP solution; no pressure washing | Drywall primer or high-adhesion interior primer |
| Bare drywall (unfinished, no paint) | New builds, freshly drywalled spaces | Dust removal only; no wet cleaning before priming | Drywall sealer/primer is essential before any topcoat |
| Concrete block (CMU block) | Older detached garages, below-grade garage walls | TSP solution or concrete cleaner; rinse thoroughly | Masonry primer (alkali-resistant) |
| Poured concrete | Basement-level garages, newer construction | TSP or concrete cleaner; acid etching if unpainted | Masonry primer; may need acid etch for bare concrete |
| Wood studs/framing (unfinished) | Older detached garages painted directly over studs | Dust and spot degrease; avoid saturating wood | Oil-based or high-adhesion acrylic exterior primer |
| Previously painted walls (any material) | Repaint projects | Full cleaning sequence appropriate to surface | Spot-prime bare areas; full coat if significant staining |
For most Toronto attached garages, the walls are either drywall (usually the walls adjoining the house, which are often drywalled per fire code requirements) or poured concrete or concrete block. Knowing which you have determines whether you need a masonry primer or a standard drywall primer.
Garage walls can accumulate a considerable amount of dust over the years. Start by removing any loose dust and debris using:
- A broom or brush to sweep the walls from top to bottom
- A shop vacuum with a brush attachment to remove fine dust and cobwebs from corners and ceiling edges
- A dry microfibre cloth for surface dust on previously painted drywall
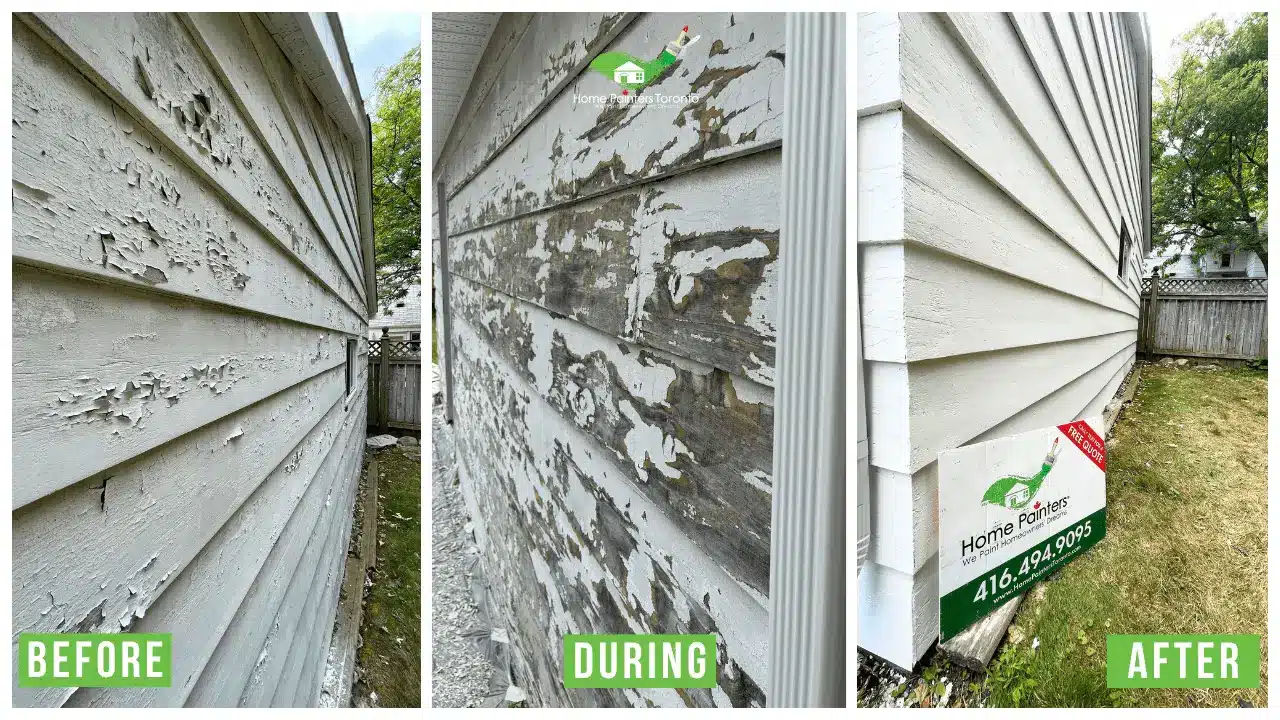
This step is not optional and is not as simple as it sounds in a garage context. Garage walls accumulate not just household dust but exhaust particulate, concrete dust from the floor, insulation fibres if the space is partially insulated, and in older garages, years of accumulated road grit and tire dust. All of this must be removed before any wet cleaning begins. Wet cleaning applied to a dusty surface turns the dust into a grimy paste that is harder to remove than the dry dust was, and any paste residue left on the wall becomes a contamination layer beneath the primer.
Work from top to bottom and from ceiling edges downward. Cobwebs in the upper corners and between wall and ceiling should be removed before anything else. In an attached garage, pay particular attention to the area around the garage door opening and the wall adjacent to the vehicle bay, which typically accumulates the highest concentration of road dust and exhaust residue.
Garage walls often bear witness to various automotive projects and hobbies. Look for any oil or grease splatters or stubborn stains. They can be particularly challenging to paint over, so make sure to address these next. A specialized degreaser helps to break down stubborn oil and grease stains:
- Purchase a quality brand from your local hardware store
- Carefully follow the application instructions provided on the product
- Usually, it involves applying the degreaser to the stained area. Let it soak for a specified amount of time, then scrub it with a stiff-bristled brush.
Grease and oil are the most dangerous contaminants for paint adhesion on garage walls. A thin invisible film of oil from an aerosol spray, engine work, or even hand contact is enough to prevent primer from bonding to the wall beneath it. The paint may look applied and even dry to the touch, but it sits on an oil film rather than bonding to the substrate, and it will peel at that point under any stress.
For heavy grease areas (the lower half of walls in vehicle bay areas, areas near workbenches where oils and lubricants were used), use a dedicated garage degreaser or a TSP (trisodium phosphate) solution as follows:
TSP solution for grease: Mix approximately 60 to 90 grams of TSP powder per 4 litres of warm water (follow product instructions for concentration). Apply with a stiff-bristled brush or scrub pad, scrub the greasy area, allow to sit for 5 to 10 minutes, then rinse with clean water. Repeat if the stain is heavy.
For truly severe oil staining on concrete block or poured concrete, a commercial concrete degreaser applied full-strength is more effective than a diluted TSP solution. Apply per instructions, scrub with a wire brush on concrete or stiff brush on block, and rinse very thoroughly. Any TSP residue left on the wall can interfere with primer adhesion, so the rinse step after TSP cleaning is as important as the cleaning step itself.
On drywall, avoid saturating the surface with water or degreaser. Drywall paper facing and the gypsum core can both be damaged by excessive moisture. Use a wrung-out sponge rather than a dripping wet brush, work in small sections, and dry the wall as quickly as possible after cleaning.
For the best results when cleaning your garage walls, TSP is the most effective cleaning agent to use. To use TSP to clean your garage walls:
- Start by mixing 120 grams of TSP in about 4 litres of warm water
- Dip a sponge or scrub brush into this solution, then start cleaning your garage wall. Work your way from the top down, scrubbing the entire surface. Remember to rinse the sponge or brush frequently to prevent redepositing the grime back onto the wall
- After scrubbing the wall with the TSP solution, rinse the wall with clean water. This removes any remaining TSP residue and loosened grime
A few additional practical points on TSP cleaning for garage walls:
Always wear rubber gloves and eye protection when working with TSP. It is a strong alkaline cleaner that can irritate skin and eyes. Work in sections from top to bottom so rinse water from upper sections runs down over already-cleaned lower sections rather than onto sections waiting to be cleaned.
For concrete block or poured concrete garage walls, a TSP wash is excellent preparation because it both cleans the surface and slightly etches the concrete, improving primer adhesion. The alkalinity of TSP is less of a concern on concrete (which is itself highly alkaline) than on drywall. On drywall, use a lighter concentration (approximately 30 to 60 grams per 4 litres rather than 120 grams) and rinse very thoroughly.
For mould or mildew visible on the wall (common in Toronto garages that have experienced any water infiltration or have poor ventilation), treat the affected area with a bleach solution (1 part household bleach to 3 parts water) before the TSP wash. Allow the bleach solution to sit for 15 minutes, scrub, rinse, then proceed with the TSP wash. Painting over untreated mould without killing it first means the mould will grow through the new paint within a season.
The no-rinse TSP substitute products (available at most Toronto hardware stores) are a convenient alternative to standard TSP for drywall walls, as they do not require rinsing and carry less risk of saturating the drywall. However, they are less effective than full-strength TSP on heavy grease contamination.
Drying the walls is equally important as cleaning them:
- Let the walls air dry if possible. This can take anywhere from a few hours to a full day, depending on the humidity and temperature in your garage.
- If you need to speed up the process, use a fan or a hairdryer on a cool setting.
For Toronto homeowners painting garage walls, drying time is one of the most commonly underestimated steps. A garage wall that feels dry to the touch at the surface may still contain significant subsurface moisture, particularly on concrete block or poured concrete, which can hold moisture for 24 to 48 hours after wet cleaning even under good drying conditions.
If the garage is attached to a heated house, ventilation and heat will aid drying. If it is a detached garage in spring or fall, drying times will be longer due to cooler temperatures and potentially higher ambient humidity. Use a moisture meter if available to check concrete before priming. A reading above 15 percent moisture content on a moisture meter suggests the concrete should dry further before primer is applied.
Applying primer or paint over a damp wall is one of the most reliable ways to produce a paint job that bubbles and peels within weeks. The moisture trapped under the film finds nowhere to go and forces the paint away from the substrate. Always allow full drying time before proceeding to repairs and priming.
Before painting, take care of any imperfections in your garage walls. You may have some cracks, holes or areas where the paint has peeled back. These should all be addressed before painting. Depending on the material, you'll want to use a spackle, joint compound, or concrete/masonry patching material to fill in the imperfections.
Repairs by Wall Surface Type
For drywall: Use lightweight spackling compound or joint compound to fill nail holes, screw dimples, and small cracks. Apply the compound with a putty knife, slightly overfilling the hole, and allow to dry fully before sanding flush. For larger holes in drywall (over 15 centimetres in diameter), a drywall patch kit with a mesh backing provides a more structurally sound repair than compound alone. Prime all repaired areas before the topcoat to prevent the compound from absorbing the topcoat differently than the surrounding primed surface (which causes visible patchy spots in the finished paint).
For concrete block: Fill missing or cracked mortar joints with mortar patching compound rather than drywall compound. Fill surface cracks and voids with hydraulic cement or concrete patching compound. Allow all masonry repairs to cure fully (a minimum of 7 days for concrete patching compound) before priming.
For poured concrete: Hairline cracks can be filled with a flexible concrete crack filler. Larger cracks should be routed out with a grinder or saw before filling to create a V-shaped channel that holds the repair better than a surface-applied filler over a narrow crack. Sand or grind any high spots or ridges on smooth poured concrete walls that would telegraph through the paint.
Fill your bucket half full with primer, and open your garage door for ventilation. The type of primer you should use depends on what your garage walls are made of.
According to Benjamin Moore's primer selection guide, choosing the right primer for the substrate is critical because different surfaces require different adhesion and sealing properties. Using the wrong primer, or skipping it entirely, is the most common reason paint fails early on garage walls.
Primer by Garage Wall Surface Type
For new or bare drywall: A dedicated drywall sealer and primer is essential. New unprimed drywall is highly absorbent and will soak up the first coat of paint unevenly, leaving a blotchy, flat finish that cannot be corrected without applying primer first. Benjamin Moore Fresh Start All-Purpose Primer and Sherwin-Williams ProMar 200 Interior Latex Primer are both reliable choices for garage drywall. Apply one full coat and allow to dry per product instructions before topcoat.
For previously painted drywall in good condition: A full primer coat is not always required if the existing paint is sound and you are applying a similar colour. If the existing paint is significantly darker than the new colour, or if there are stain or odour issues (smoke, oil seepage through drywall), a stain-blocking primer (Zinsser BIN, Kilz Original) provides the most reliable coverage.
For concrete block and poured concrete: An alkali-resistant masonry primer is required. Standard drywall primers are not formulated to handle the high alkalinity of concrete, which will cause paint applied over an inadequate primer to fail at the adhesion level. Benjamin Moore Ultra Spec Masonry Primer or Sherwin-Williams Loxon Concrete and Masonry Primer are both appropriate for garage concrete walls. For bare, smooth poured concrete that has not been previously painted, a light acid etch before priming (phosphoric acid wash per product instructions) improves primer adhesion by opening the surface pores.
For bare wood framing: An oil-based or high-adhesion acrylic exterior primer provides better sealing on raw wood than standard interior drywall primer, which can be absorbed unevenly. Apply the primer to all wood surfaces including end grains.
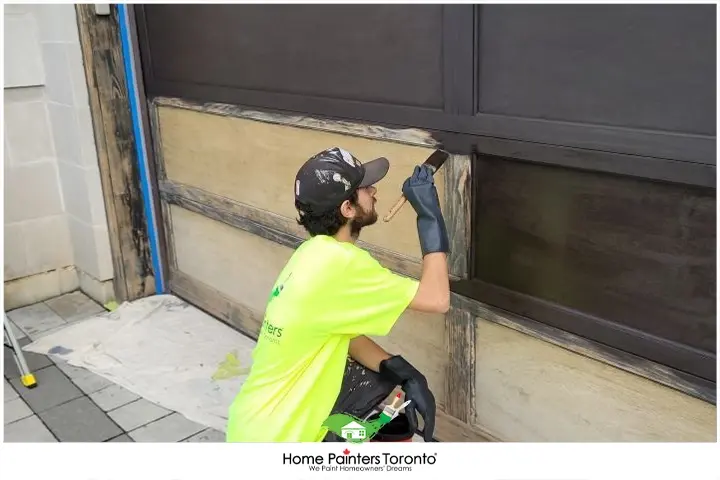
Application technique: Apply primer by roller on large flat surfaces (19mm nap for concrete block, 10mm nap for drywall) with a brush for corners and edges. One coat is standard for most previously painted surfaces in good condition. Two coats may be needed on bare concrete block or concrete with heavy staining.
Follow up by painting like you did the primer and let the paint dry between coats.
Best Paint for Garage Walls: Product and Finish Recommendations
The right paint for garage walls depends on the wall material and the use of the space.
For drywall garage walls in a residential Toronto home: A quality interior latex paint in eggshell, satin, or semi-gloss finish is appropriate. Eggshell is the minimum recommended sheen for garage walls, as flat paint shows marks easily and is difficult to clean. Semi-gloss is the most practical sheen for a working garage because it is the most washable and most moisture-resistant. Benjamin Moore Ben Interior in semi-gloss and Sherwin-Williams ProClassic Interior are both reliable choices that clean well and resist the scuffs and marks common in a garage environment.
For concrete block and poured concrete garage walls: Use a masonry-specific interior/exterior paint or an elastomeric masonry coating. These products are formulated to flex with concrete and resist moisture infiltration better than standard interior latex paint applied over concrete. Sherwin-Williams Masonry Paint or Benjamin Moore Ultra Spec Masonry are both appropriate options. Avoid standard interior latex on concrete walls, which lacks the alkali resistance and flexibility required for masonry substrates.
For a garage that doubles as a workshop, utility room, or regularly sees vehicle traffic: Consider a semi-gloss or gloss finish, which is easier to wipe down and more resistant to the grease, chemical, and moisture exposure common in active garage spaces.
Application Order and Technique
Start with the ceiling before the walls if the garage ceiling is also being painted. Painting in the order ceiling, walls, and finally any trim or baseboards prevents ceiling paint from dripping onto finished wall surfaces.
For walls, cut in all corners, edges, and transitions with a brush first before rolling the flat wall surfaces. A 100mm (4-inch) brush is appropriate for cutting in garage wall corners and ceiling edges. Use a 19mm (3/4-inch) nap roller for concrete block walls to work paint into the block texture, or a 10mm (3/8-inch) nap for drywall.
Work in sections from top to bottom and maintain a wet edge across each section. Do not let a section dry before completing the full wall, or lap marks will be visible in the finished paint under certain light angles.
Two coats are standard for any garage wall project. On new drywall over primer or on concrete block, two coats are non-negotiable for even colour and adequate film thickness. On previously painted walls where colour change is minor, a single coat may sometimes be sufficient, but two coats are still recommended for maximum durability in a garage environment.
Allow the first coat to dry fully (typically 4 to 6 hours for quality latex paints in a ventilated garage) before the second coat. Do not rush this step. A second coat applied over a not-fully-dried first coat can lift the first coat or produce a sheen mismatch.
Garage Wall Colour Choices
White and off-white are the most popular garage wall colours in Toronto, and for practical reasons. White walls make a garage significantly brighter without any additional lighting, and brightness is one of the most useful functional improvements a garage paint job delivers. It also makes the space feel larger, which matters in the typically compact garages attached to Toronto semis and detached homes.
For homeowners who want to create a more finished or workshop-like feel, light grey (matching the grey tile or epoxy floor common in renovated Toronto garages) creates a cohesive, clean aesthetic. Benjamin Moore Repose Gray or Sherwin-Williams Agreeable Gray both work well on garage walls and coordinate naturally with common floor coating colours.
Avoid very dark colours on garage walls, which absorb light and make an already dim space feel smaller and harder to work in. Bold accent colours on a single feature wall can work in a finished garage or home gym space, but should be used with restraint in a working vehicle garage.
Cleaning before painting garage walls may seem like a hassle, but it's essential to achieve a professional-looking finish. By incorporating these steps into your painting project, you'll ensure the new paint sticks properly, less susceptible to chipping and flaking. So roll up your sleeves. It's time to get your garage walls squeaky clean and ready for their makeover! If you want to hire a professional, start by prepping your space, but leave the wall repair and all the steps after it to us! We'd be happy to take on this job for you! Painting the garage can add massive value to your home, but a professional calibre paint job will look best. We can also help you choose the best paint for your garage and which finish to pick.
Alkali-resistant masonry primer on concrete block and drywall sealer on finished drywall — matching primer to surface is the decision that determines how long garage wall paint holds up.
DIY vs. Professional Garage Wall Painting in Toronto
| Factor | DIY | Professional |
|---|---|---|
| Cleaning and prep time | 4 to 8 hours for an average Toronto attached double garage | Included in professional scope |
| Skill required for drywall | Low to moderate | Professional finish quality |
| Skill required for concrete or block | Moderate; primer selection is critical | Correct product for surface guaranteed |
| Result quality | Good if prep is thorough | Professional finish; correct primer and topcoat for every surface type |
| Total time including drying | 2 to 3 days including drying between stages | Typically 1 to 2 days with professional crew |
| Cost | $200 to $500 in materials for an average Toronto garage | $800 to $2,500 depending on garage size and scope |
| Best for | Standard drywall walls in good condition, no major staining or repairs needed | Concrete or block walls, significant staining, mixed surface types, or where a spray-applied professional finish is the quality goal |
What Does Garage Wall Painting Cost in Toronto?
DIY Cost Estimate
- Masonry or drywall primer (depending on surface): $40 to $80 per pail
- Interior semi-gloss or satin latex paint: $50 to $90 per 3.78L (a standard 2-car attached Toronto garage of approximately 50 to 60 sq m of wall surface requires 2 to 3 pails for two coats)
- TSP cleaner: $10 to $20
- Spackle or concrete patching compound: $15 to $30
- Roller covers, brushes, drop cloths, painter's tape: $30 to $60
- Total DIY materials for a standard Toronto attached single or double garage: $200 to $450 CAD depending on scope and surface condition
Professional Cost Estimate
Professional garage wall painting in Toronto typically runs $800 to $2,500 CAD depending on the size of the garage, the wall surface type (drywall is faster than concrete block), the extent of cleaning and repairs needed, and whether the ceiling is included in the scope. The premium for professional garage wall painting is concentrated in the prep: proper degreasing, correct primer selection for each surface, and the skill to produce an even, streak-free finish in a space that is challenging to light and work in.
For a precise quote based on your specific garage, request a free estimate from Home Painters Toronto. Our team has been painting Toronto residential and garage interiors since 1987.
Real Project: Garage Wall Painting in Toronto
Etobicoke Attached Double Garage: Mixed Drywall and Concrete Block Repaint
Here is a summary of a recent garage painting project our team completed on an attached double garage in Etobicoke.
The situation: The homeowner was converting the garage into a multi-use space combining vehicle storage and a home workshop. The walls were a mix of unpainted drywall on the house-facing side (required by fire code) and unpainted concrete block on the remaining three walls. The concrete block had years of accumulated dust and two areas of oil staining from previous automotive work. The homeowner wanted everything painted white to maximize brightness.
What the job involved: Our team began with a full degreasing of the concrete block walls using a TSP solution, paying particular attention to the two oil-stained areas, which required a second TSP application and scrubbing before the staining was sufficiently cleared. All surfaces were allowed to dry for 48 hours. The drywall received one full coat of Benjamin Moore Fresh Start primer. The concrete block and poured concrete received one full coat of Sherwin-Williams Loxon Masonry Primer. Both substrate types were then painted with two coats of Benjamin Moore Ben Interior in semi-gloss bright white.
The result: A clean, uniformly bright white garage with all surfaces primed and painted correctly for their material type. The homeowner noted the space felt entirely different with white walls, and that the combined workshop and vehicle area was significantly more functional and pleasant to work in. The careful degreasing of the oil-stained concrete block walls was the step that made the difference in adhesion quality. For more completed projects, visit our Toronto painting projects page.
Frequently Asked Questions About Painting Garage Walls
For garage walls with grease or oil contamination (concrete block, lower drywall in vehicle bays), a TSP (trisodium phosphate) solution is the most effective cleaner. Mix approximately 60 to 90 grams of TSP per 4 litres of warm water, scrub, and rinse thoroughly. For drywall garage walls in good condition without grease, a mild dish soap solution or no-rinse TSP substitute is sufficient and carries less risk of saturating the drywall. For mould or mildew, a diluted bleach solution (1 part bleach to 3 parts water) should be applied before the TSP wash.
Yes, in almost all garage wall situations. The primer type must match the wall surface. New or bare drywall requires a drywall sealer primer. Concrete block and poured concrete require an alkali-resistant masonry primer. Previously painted walls in good condition with a minor colour change can sometimes be painted over without a full primer coat, but bare spots, repairs, and stained areas always require spot-priming before topcoat. Skipping primer on new drywall or bare concrete is the most common cause of blotchy, poorly-adhered garage wall paint.
Semi-gloss is the recommended sheen for most garage wall applications. It is the most washable, most moisture-resistant, and most practically useful finish in a working garage. Satin is acceptable if a slightly less reflective finish is preferred. Eggshell is the minimum recommended sheen; flat or matte should not be used on garage walls as it is difficult to clean and absorbs grease and marks.
No. Concrete block is highly alkaline, and standard interior latex paint is not formulated to resist alkali attack from the concrete. Paint applied without a masonry-specific, alkali-resistant primer over concrete block will fail at the adhesion level even if it appears to apply correctly. Use an alkali-resistant masonry primer followed by a masonry paint or a premium interior latex that is specifically rated for masonry and concrete surfaces.
Including cleaning, drying, priming, and two topcoats with drying time between coats, a standard Toronto single garage takes 2 to 3 days to complete as a DIY project. The drying times drive the timeline more than the application time. A double garage requires the same number of days but proportionally more work within each stage. A professional crew with two to three people can typically complete a standard garage in one to two days.
Apply a dedicated degreaser or a concentrated TSP solution directly to the oil-stained area. Allow it to soak for 10 to 15 minutes, scrub vigorously with a stiff-bristled brush, and rinse thoroughly with clean water. Repeat if needed. For old, deeply-set oil stains on concrete block or poured concrete, a second or third treatment with the degreaser is often necessary. Even after cleaning, if a stain has soaked deep into porous concrete, a stain-blocking oil-based primer (Zinsser Cover Stain or Kilz Original) applied over the cleaned and dried area before the masonry primer will prevent the oil bleed-through from discolouring the topcoat.
More Interesting Blogs Related to How to Clean Walls Before Painting the Garage
Want Your Garage Walls Painted Professionally?
Home Painters Toronto has been painting Toronto residential and garage interiors since 1987. Call 416-494-9095 or email [email protected] for a FREE quote.