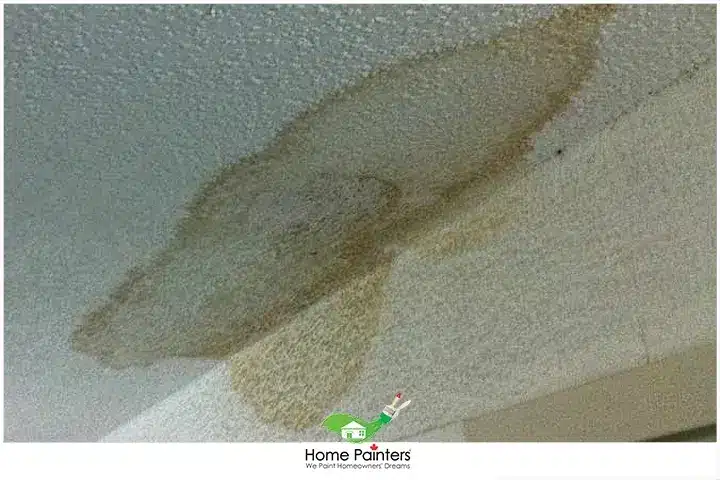
How to Re-Stucco Your Ceiling if There is A Water Stain

It’s easy to re-stucco your ceiling if there is a water stain. Did you notice a water stain on your stucco ceiling? Don’t despair. Repairing and applying stucco or popcorn to your ceiling isn’t as difficult as you might think. Sure, it’s a little more work than repairing a flat ceiling, but on the flip side, stucco or popcorn ceilings can hide drywall and tap imperfections better, which can make the job easier.

Flat ceilings are in style right now, but there are still many benefits to a popcorn ceiling. Besides providing better acoustic insulation, stucco texture ceilings also do a great job of hiding flaws in drywall taping.

Whether you are applying a brand-new textured ceiling or simply repairing one location, there are a few application methods to choose from.

What Causes Water Stains on the Ceiling

There are several causes of water stains on ceilings, including but not limited to:

• Leaky roof: A leaky roof, often due to aging, cracked shingles, or deteriorating flashing, can lead to water stains on the ceiling. Storms, wind, and heavy rain can also cause damage to the roof, leading to leaks.

• Plumbing issues: Leaking pipes or plumbing fixtures, such as pipes that run above the ceiling, may result in water stains. It’s important to fix these issues to prevent further damage.

• Condensation: In some cases, high humidity levels or inadequate ventilation can cause condensation stains on the ceiling to accumulate on cold surfaces, such as the ceiling, leading to water stains.

• HVAC system problems: Issues with your heating, ventilation, and air conditioning system, like leaking ductwork or condensation from the air conditioning unit, can also cause water stains on the ceiling.

Stucco Ceiling with Water Stain

Methods to Re-Stucco Ceiling

Spray-On To Re-Stucco Ceiling

A common method for applying a textured ceiling is to spray it on. While the traditional method of re-stuccoing involves applying the stucco with a trowel, the spray-on technique is a more efficient alternative if you have a large surface to handle or are looking for a faster but equally effective solution. Here’s a step-by-step guide on how you can use spray-on stucco for your ceiling:

Tools and Supplies Required:

  • Safety goggles and a mask
  • Plastic sheeting or dust cloths
  • Ladder
  • Scraper
  • Mild detergent or bleach
  • Scrub brush
  • Warm water
  • Primer
  • Paintbrush or paint roller
  • Spray-on stucco
  • Paint (of the same shade as your ceiling’s)
Painter Repairing Stucco Ceiling

Step 1: Preparing and Cleaning the Ceiling

Your first steps, preparing the stained area and cleaning the ceiling, remain the same as with the trowel method. Use a scraper to remove the damaged parts of the stucco and clean the stained area thoroughly with a mixture of warm water and mild detergent or bleach.

Step 2: Apply Primer

Just as you would in the traditional method, apply a good quality primer over the stain and surrounding area. Let it dry fully before proceeding to the next step.

Step 3: Spray-On Stucco Application

Now, instead of applying a stucco mixture with a trowel, use a ready-made spray-on stucco. These are usually available in aerosol cans or for use with a hopper gun. Begin spraying from one end of the stained area, making sure to maintain a consistent hand speed and distance from the ceiling to ensure an even texture.

Remember to keep the spray moving to avoid an uneven, clumpy texture. Follow the manufacturer’s instructions carefully, as some products might require a certain shaking or preparation routine.

Step 4: Painting and Maintenance

After allowing the stucco to dry fully (usually in 24-48 hours), paint over the newly stuccoed area with paint matching your ceiling colour. As always, regular maintenance of your ceiling will help keep it looking fresh and prevent further water stains.

Spray-on stucco cans or hopper guns offer a faster and less messy way to handle larger surfaces or harder-to-reach areas. While they might require a bit more practice to ensure a consistent finish, they can save considerable time and energy in the re-stuccoing process.

Roll-On Texture To Re-Stucco Your Ceiling

Applying a roll-on texture to your ceiling is an excellent, mess-free option for re-stuccoing and can be especially helpful for larger stained surfaces. This method ensures an even texture and is less labour-intensive than the trowel application technique.

To roll on a textured ceiling, you will need to use texture paint and a roller called a loop roller. Instead of a soft nap, a loop roller is made with a more fibrous nap that is suitable for spreading heavy paint. Here’s how you can re-stucco your ceiling using a roll-on texture:

Supplies Required:

  • Safety goggles and a mask
  • Plastic sheeting or dust cloths
  • Ladder
  • Scraper
  • Mild detergent or bleach
  • Scrub brush
  • Warm water
  • Primer
  • Paintbrush or paint roller
  • Roll-on texture (pre-mixed stucco)
  • Paint roller and tray
  • Paint
Painter Repairing Stucco Ceiling

Step 1: Initial Preparation and Cleaning

Follow the same steps as in the traditional stucco application to prepare the stained area and clean the ceiling.

Step 2: Apply Primer

Primer prevents the water stain from showing through the new layer of stucco. Use a brush or roller to apply a primer over the cleaned stain and let it dry.

Step 3: Prepare and Apply the Roll-On Texture

Roll-on texture is a pre-mixed stucco product that you can apply using a paint roller. It comes in various textures, so you can choose the one that matches your existing ceiling. Put some roll-on texture in a roller tray, then use a roller to apply it evenly to the ceiling. Remember to maintain a firm and consistent pressure to ensure an even texture.

Step 4: Create Your Desired Stucco Texture

Unlike the traditional or spray-on methods, with roll-on stucco, you create your desired texture after the roll-on application. Depending on your ceiling’s original texture, you can use various tools to mimic it. Some common methods include using a stomp brush for a crow’s foot texture or a drywall knife for a knockdown texture.

Step 5: Painting and Maintenance

Once the stucco is completely dry, apply the matching paint on the stuccoed area. As with other methods, regular maintenance of your ceiling is essential to keep it in its best shape.

This roll-on texture method for re-stuccoing your ceiling is less physically draining than the trowel method and cleaner than the spray-on method. This alternative is also great for those wishing to avoid the labour-intensive trowel technique but still produce similar results.

Instructions to Re-Stucco Your Ceiling If There is a Water Stain

Find the Source of the Water:

This is a very important step that should not be missed. After all, if you do not repair the source of the water, the stain could just return. Possible causes of water stains in a ceiling include a leaky pipe, a small leak from the roof, and condensation. A dry stain means the problem has most likely been fixed, but it is still good to find out. Repair the source of the leak. You may need to apply a piece of drywall if you have to cut into the ceiling.

Prepare the Area:

This can be a messy job, so it is important to lay a drop cloth on the ground and cover anything that could potentially get paint on it.

Safety First:

You will want to wear protective glasses and a mask over your mouth. You might also wish to wear gloves.

Remove Old Popcorn:

If you don’t need to access anything through the ceiling, you will simply want to scrape off the stain from the ceiling.

Spray on the Texture:

If you are using the spray-on method, you will want to find Spray Popcorn Ceiling in a spray can. Shake it well. Hold the can approximately 12 inches from the ceiling and begin spraying. You will want to do quick strokes. Continue working in back-and-forth strokes of spraying until the area is covered.

Roll On the Texture:

If you choose a roll-on product, you will simply apply the roll-on texture ceiling to your roller and then gently roll onto the ceiling. Apply lightly and go over as needed. It is much better to build up the texture than to do it in one big coat. When rolling on texture, it is important to roll in one direction only and not go back and forth like you might when painting a wall.

If the water stain is small, dry, and does not seem to be caused by a leak that needs to be repaired, you can simply re-paint over the current area with ceiling paint that is the same colour.

Additional Tips For Your Stucco Ceiling

  • Primer – Stucco is porous, so it’s always important to prime the ceiling before painting. Again, use a thick nap roller.
  • Painting vs Spraying – Whether you choose to spray on the stucco or roll on the stucco is largely a personal choice. Spraying can be quicker and is a great choice for larger areas. But you may still need to roll or brush on the paint in smaller areas that spraying cannot reach. Some people find it easier to roll it on. This is because it can provide more consistent results.

Need to Re-Stucco Your Ceiling If There is A Water Stain? When to Call the Professionals

When dealing with water stains before you re-stucco your ceiling, sometimes it is best to call the professionals. That way you can properly assess and fix the source of the water damage. Home Painters Toronto’s crew includes handyman services so it’s a one call fix. Give us a call and we will provide a quote to assess, fix and re-stucco your ceiling. We have years of experience and will ensure your ceiling looks its best.

Home Painters Toronto’s crew includes handyman services, so it’s a one-call fix. Give us a call and we will provide a quote to assess, fix, and re-stucco your ceiling. We have years of experience and will ensure your ceiling looks its best. Please give us a call at 416.494.9095, or email us at Brian@HomePaintersToronto.com. Also, don’t forget to follow us on all our social channels below as well!