
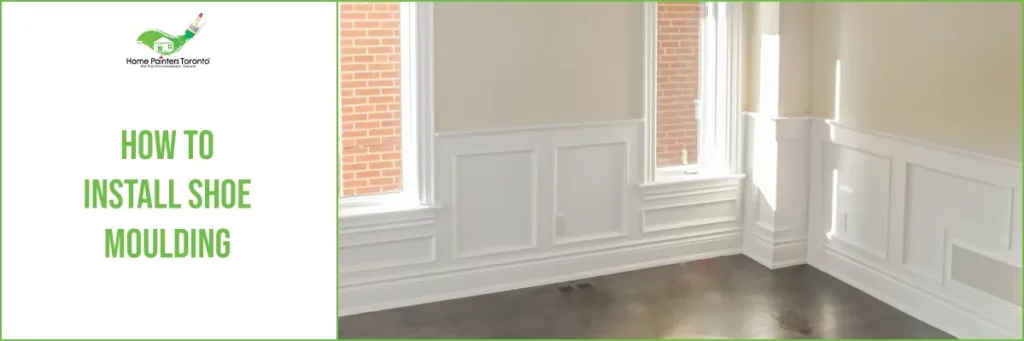
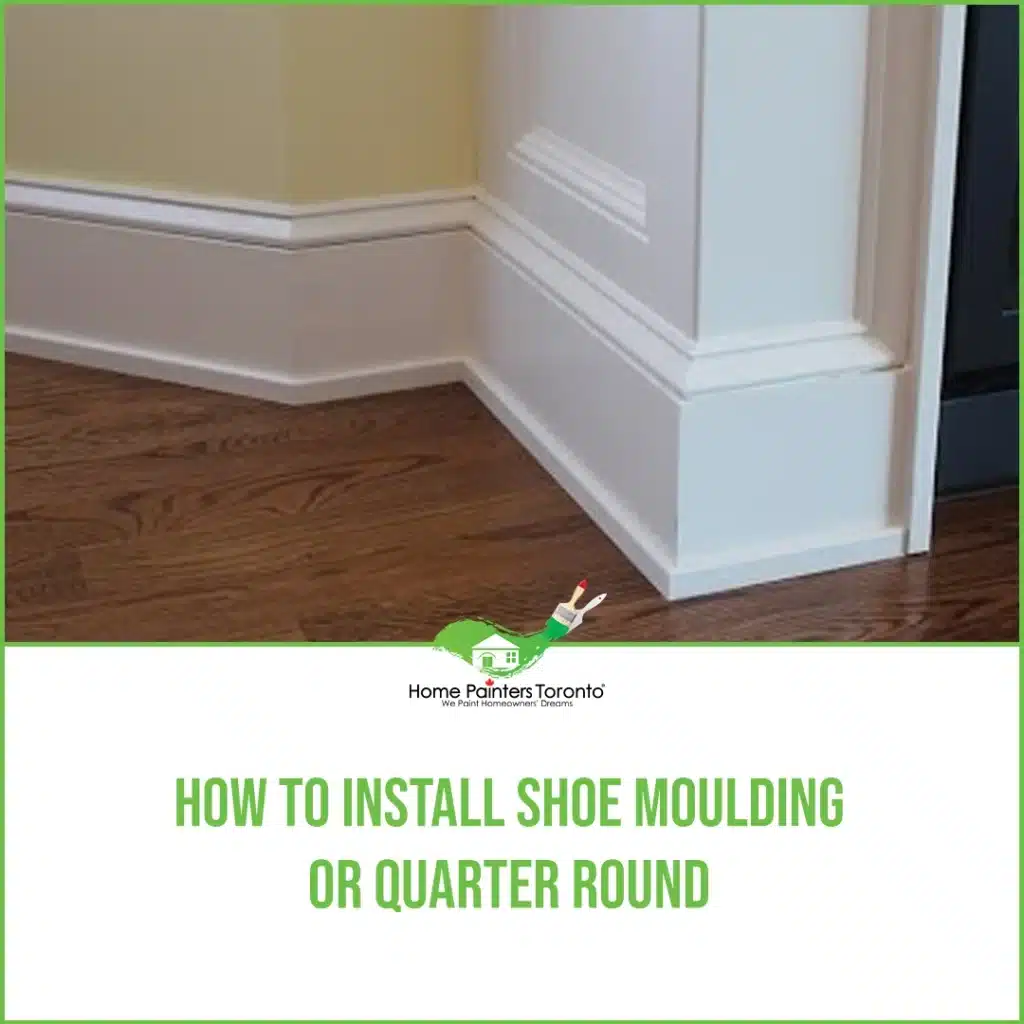
What is shoe moulding? Shoe moulding is a narrow trim piece installed at the junction of your floor and baseboard. Its primary function is to conceal gaps and unevenness between the floor and the baseboard, providing a more polished and finished look to your interior design.
To install shoe moulding, also known as base shoe, it involves covering the gap between the baseboards and the floor. In addition, shoe moulding is a beautiful detail of a thin strip of wood. It is painted or stained to match your trim, and if placed in the right angle, your floor and baseboard will look quite straight. Baseboards are usually straight, but floor coverings are not. Especially in older homes because sags between joists are a relatively familiar showing. Even in newer homes, it would still be difficult to ensuremake sure the floors are flat and smooth. Thus, fixing the gap is very important for this installation to work. Although it is not a clean solution, interior painters suggest injecting caulk intoto the baseboards, but installing shoe moulding is better.
Let’s dig into how to install shoe moulding!
Shoe Moulding Installation
Shoe moulding sounds like a complicated task, but the installation is fairly easy. It is inexpensive and will give your floor a very polished and elegant look. There are two types of moulding: shoe and quarter-round. You will notice after installing them that while they look the same, the profiles are different. Based solely on the name, quarter-round looks like one-quarter of a full circle, and the flat faces are the same width. Thehe length of a quarter-round sticking out from the wall, is the same as its height. Shoe moulding, on the other hand, allows the trims to give off a finished look. Think of it as “hugging to the baseboard.”
Shoe Moulding vs Quarter Round
When it comes to enhancing the appearance of your home’s interior, the little details make all the difference. One such detail is the type of trim installed at the intersection of walls and flooring. Among these trims, shoe moulding and quarter-round moulding are popular choices. Below are the main differences between the two in terms of aesthetics, function, and cost to help you make the right decision for your home.
Shoe Moulding: A Quick Overview
Shoe moulding is a narrow, flat trim piece typically measuring 1/2 inch wide and 3/4 inch tall. Its primary purpose is to conceal gaps and uneven lines between the floor and the baseboard. With a flexible profile, shoe moulding easily adapts to floor irregularities and contours, giving a clean, polished, and finished appearance to any room.
Quarter Round: A Brief Introduction
Quarter-round moulding is similar in function to shoe moulding, as it also bridges the gap between baseboards and floors. However, the key difference lies in the shape: quarter-round moulding has a 90-degree-angled profile, with one flat face sitting against the wall or baseboard and the other against the floor. The third face, which connects the two flat faces, forms a quarter-circle or half of a right-angle triangle.
Now that we’ve familiarized ourselves with these two options let’s dive into their main differences.
Aesthetics: Different Styles for Different Spaces
Shoe moulding trim has a sleek, minimalist design that can complement most modern interiors. Its sleek appearance allows it to blend seamlessly into baseboards, making it almost invisible to the casual observer. This subtle approach makes it a popular choice for homeowners looking for an understated, elegant finish.
Quarter round, on the other hand, is more prominent due to its curved profile. This moulding style can be more forgiving with edge imperfections, making it a suitable choice for older homes or spaces where more substantial gaps must be covered. Additionally, quarter round offers a more traditional, classic aesthetic that pairs well with vintage or rustic design themes.
Functionality: Adapting to Different Flooring Types
Shoe moulding’s flexibility helps it contour to the unevenness or waviness of the floor, providing an excellent seal between the baseboard and the floor. This makes shoe moulding particularly suitable for installations involving hardwood or laminate flooring, which often requires some flexibility to accommodate expansions or contractions in response to temperature and humidity changes.
Quarter round’s rigidity makes it better suited for rooms with highly regular floor surfaces or evenly tiled floors. While it can still be used with hardwood or laminate flooring, its inflexibility may limit its ability to create a flawless seal in cases of significant floor irregularities.
Cost: How Your Budget Plays a Role
Both shoe moulding and quarter-round are relatively inexpensive trim options. The difference in cost typically depends more on the materials used and the complexity of the design rather than the style itself. Various materials, including wood, MDF, and PVC, can be used for shoe moulding and quarter-round, with prices varying depending on the material and finish you choose. Be sure to consider your budget alongside aesthetic and functional factors when making your decision.
Usage of shoe Moulding Or Quarter Round
Shoe moulding and quarter-round are long lengths of wood that start off as long round dowels, then you can cut them into respective shapes. They are extra-lengthy so that you can use the entire wood to cover your walls. You can easily turn this extra-length wood into smaller pieces, but an interior painting company would advise against that, seeing as full-length gives a smoother look. Don’t worry, though, the wood comes straight, but it can easily be bent during installation.
How to install shoe moulding
- Firstly, if you are removing old base moulding, use your utility knife to cut through the paint that is stuck on the base moulding. That way, the paint is not chipping onto the baseboard as you try to pry it away from the base moulding.
- With a hardened putty knife, loosen the base moulding by pushing it behind and under the base moulding. Be careful not to hinder the baseboard or the floor. Now, pry the moulding away from the baseboard using a flat bar and remove all the nails attached.
- Now, you have the opportunity to sand and paint the baseboards. If they are in excellent shape, continue with the base moulding installation. Preparation is key though, so don’t forget to prep and apply a finish to them, before cutting the mouldings to the right length. Then, gently sand your new wood mouldings, and lay them on a set of saw horses.
Four cutting and joining techniques
Installing the new mouldings is actually an easy process. There are four cutting and joining techniques that work best with shoe moulding and quarter-round shapes.
- End of run: When the base moulding ends at a door casing, you need to cut a 45-degree mitre and butt the tip of it up against the object. For it to be successful, it needs to end at the same point the baseboard ends. When it is complete, do a light touch-up of the ends, with the same finish on the face of the base moulding.
- Mid-run joint: Let’s say you have a long run that requires two pieces of moulding: do not put together the two ends of moulding. However, you should use the mitre cut (45 degrees) to both ends, so that they eventually overlap at the joint. This will not create a gap as the wood shrinks and expands.
- Outside corner: Cut two 45-degree miters and compare them on the outside corner. If the corner is not perfectly 90 degrees, you would have to crave the mitres slightly greater or less than 45 degrees.
- Inside corner: On this last technique, run your base moulding all the way to the perpendicular baseboard corner. You do not need to mitre the first piece. Instead, mitre cut (45 degrees) the other piece coming into the corner. Then, using the coping saw, follow the curved edge of your mitre cut to trim off the back part of the moulding.
Materials Needed:
- Shoe moulding
- 2-inch finishing nails
- Wood filler
- Wood stain
- Varnish
- Sandpaper
Tools List:
- Tape measure
- Miter saw
- Drill and drill bits
- Coping saw
- Nail set
- Utility knife/Putty knife
- Flat bar

Final steps
You are almost done installing shoe moulding! In the last few steps, use a utility knife to remove any wood that would prevent a tight fit into the corner. Place the mitered piece into the other piece that is flush with the wall. Now that you finally know how to handle the various types of cuts and joints, you can begin to install the base moulding from a corner. Then, slowly work around across the room. Cut each piece and put it in place. Drill pilot holes to prevent splitting when you nail it. Drill the holes at an angle, so that the moulding is pulled shut to both the baseboard and floor. You are essentially nailing the moulding to the baseboard. Lastly, use two-inch finishing nails and set them, while filling the holes with wood filler. You have now installed shoe moulding!
How to avoid common mistakes
To install shoe moulding, you need preparation and precision. The time it takes to complete this installation depends on if you are a beginner or have the help of an interior painting service. If you are a beginner, it will take you roughly 1 to 2 hours. If you have the help of an interior painting service, it would take roughly 30 mins to 1 hour. Always try to wear protective gear, such as eye protection, because you are dealing with heavy power tools. There are many common mistakes that beginners can make, especially during this particular installation. The biggest mistake is if you have quarter-round moulding and you install shoe moulding, it will not cover as much of your floor as quarter-round. Instead, your new exposed part of the floor will not match the rest of the floor. A helpful tip is to access the entire perimeter of the room you want to install. That way, nothing can interfere with the task at hand.
Installing shoe moulding may seem like a small detail, but it can have a considerable impact on the appearance of your home’s interior. By following this step-by-step guide, you’ll ensure a professional-looking finish, adding elegance and charm to your living space. With a little effort and attention to detail, you can enhance the character of your home by beautifully blending your floors and baseboards.
More Interesting Blogs Related to
“How to Install Shoe Moulding”
If you aren’t feeling up to the extra work, why not let Home Painters Toronto take a load off your back! With over 37 years of experience in home painting and renovations, allow our professional house painters to handle the hard work for you. Call us NOW at 416.494.9095, or email us at [email protected] to get a FREE estimate for your project and consultation. And don’t forget to follow us on all our social channels below!