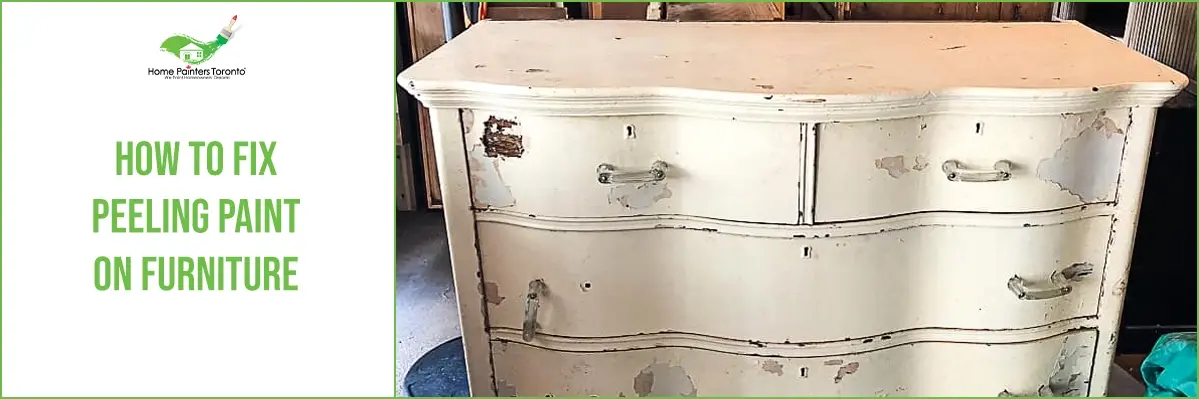
Peeling paint on your lovely furniture might be a painful sight. Have you ever experienced, at any point, painting a piece of furniture just to find a few weeks later that the paint is peeling? In the wake of putting so much time, energy, and money into painting a piece. As a result, it can undoubtedly keep you from ever painting the same furniture again.
There’s presumably an old dresser, seat, or table you’ve sequestered in a dim corner of your storage room that is secured with split and rankled paint. Regardless of whether the piece is a family treasure or simply something you got up a carport deal, you can expel the paint and transform it into a trendy house
Paint does not completely stick to the surface as it is supposed to stick, which is one of the reasons for peeling off paint from the surface of a piece of furniture.
Reasons for peeling paint on Furniture
- One of the most common reasons for this problem is that the paint is applied in an open environment. It can also occur when the painting is done over surfaces covered in a build-up of dust and sand. The furniture is the most likely piece for these two issues to occur, creating the best conditions for peeling paint.
- Lacking surface preparation is the primary guilt behind the crack attack. Over-diminishing your paint or applying it daintily can likewise make it split. Not allowing sufficient time to dry between coats can also lead to these problems.

The problem you’ll face when
- Painting a piece of furniture should not be easy, so prepare yourself for an intense body and arm workout. The more time you spend preparing the piece, the less maintenance you’ll be doing on little chips of paint later on.
- Inside the home, over-the-top moisture may originate from high humidity in the basement. Outside of the home, peeling can be caused by inadequate caulking, weather, a leaky roof, and a dusty environment.
- Get a combo pack of sandpaper that incorporates medium and fine coarseness. You’ll be utilizing the medium coarseness to knock off the completion, so your groundwork will stick better, and the fine coarseness to sand between painted layers.
How to Fix Peeling Paint On Furniture
We will walk you through a comprehensive, step-by-step guide on how to fix peeling paint on your loved furniture and restore its former glory.
Step 1: Assess the Damage
The first step is to inspect the furniture to assess the extent of the peeling. Determine how much of the surface is affected and whether the piece will require a complete paint job or a touch-up.
Step 2: Gather Your Supplies
Tools you’ll need
- Fine/Medium grit sandpaper
- Finishing wax
- Primer
- Semi-gloss paint
- Lint-free rag
- Drop cloth
- All-purpose cleaner
Step 3: Preparation is Key
Before you begin, protect your workspace by laying down a drop cloth or old sheets. This will catch any falling paint flakes and dust. Remember to put on your protective gear to shield yourself from dust and chemical exposure.
Step 4: Remove the Peeling Paint
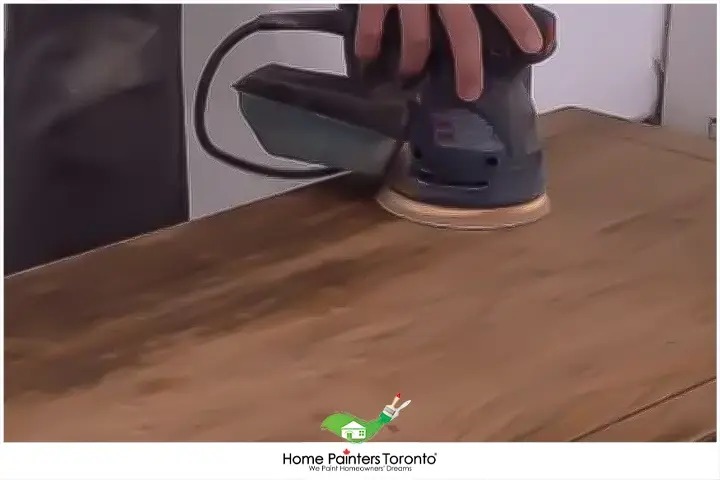
Wash the piece of furniture with an All-purpose cleaner. Let a piece of furniture dry completely. Remove all glossy finish and make it dull and flat by using Medium grit sandpaper. Also, use your paint scraper or putty knife to gently scrape off the peeling paint. Start from the edge of the peeled area and work your way underneath the paint, lifting it off the surface. Be careful to avoid gouging the surface or causing unnecessary damage. Remove sanding dust with a vacuum and wipe it with water spray.
Step 7: Apply Primer
Primer is crucial for sealing the surface and ensuring proper adhesion of the paint. Use a paintbrush or foam roller to apply a thin, even layer of primer. Apply one coat of primer. Follow the way of grain and make sure not to leave any drips behind.
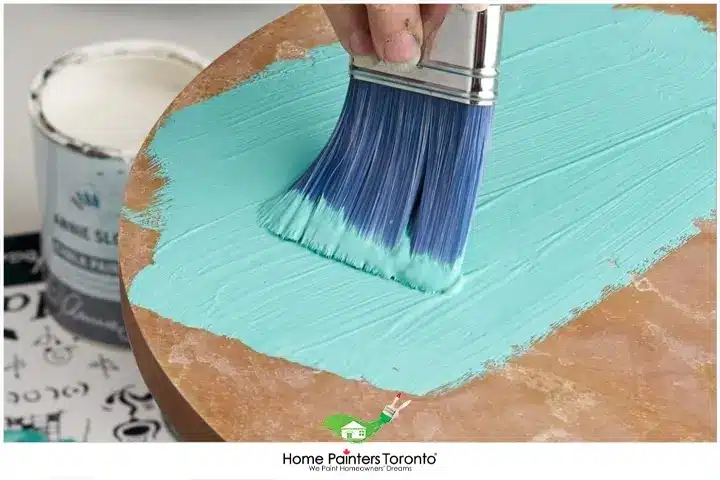
Step 8: Paint the Furniture
With a good quality brush or foam roller apply the first coat of semi-gloss following the way of the grain as you apply the paint. Apply thin, even coats to prevent drips and uneven coverage. Depending on the colour and type of paint you’re using, you may need to apply multiple coats for the best result. Make the coat super glossy and give it a good finish. More layers of paint will lead to a stronger finish.
Step 9: Let it Dry and Enjoy!
Finally, let your freshly painted furniture dry completely, as rushing this stage could ruin your hard work. To protect the finish, cover it with wax or spray. Once it is dry, your newly restored piece is ready to shine!
Quick Tips to Prevent Paint Chipping on Furniture
To retain the vibrant look of your painted furniture and prevent it from chipping, follow these short and simple tips:
- Use high-quality paint: Opt for durable acrylic or latex-based paints.
- Prepare the surface: Clean, dry, and dust-free surfaces promote better paint adhesion.
- Apply a primer: This creates an ideal surface for paint adherence.
- Layer your paint: Apply multiple thin coats, letting each one dry before adding the next.
- Seal your paint: A final sealant or top coat like polyurethane or polyacrylic enhances protection.
Some Things To Keep In Mind:
Remove dust
Sanding is a boring and more hardworking task. Mainly newly painted cabinet or furniture contains dust. The idea of using a power sander is good but it makes too much noise. In already finished painted furniture the most essential thing is Sanding. Whenever you are working inside wear a proper mask and filter, vacuum often, and clean furniture with a piece of cloth.
Painting in a large space
Ensure that you have plenty of space to eliminate the problem of sand and dust outside. But painting in the winter in Canada outside is not an option. Painting in a small space is not difficult but you have to cover everything around it. Be observant about your set-up for painting and keep that place nice and clean.
Disassemble a piece of furniture
It is quite obvious that if you can apart furniture that helps you to stay organized. Also, it will be easier to paint on furniture at every crack or corner.
Tips and tricks for professional painting
Here Are the Top five Tips and Tricks to make you a pro painter.
- All corners must be cut properly.
- Take a generous amount of paint into a roller.
- Roll over 4-5 times to spread the paint more evenly.
- Remove access paint by rolling the roller again on it. It smooths the surface.
- Repeat
MAKE A PROPER COLOUR MATCH
There are several colour combinations available on the internet. The proper colour match of the furniture with the walls looks great and eye-catching. New greenery and vivid blooms make springtime an inviting sight after a long winter. Blue colour represents “trustworthy and calming” while the red colour represents “powerful and confident.”
PAINT IT
After learning all good techniques, removing dust, and choosing matching colours, you are all good to go. Start painting with all your personal protective equipment. Because safety is more important.
ALWAYS REMEMBER
Be sure your first coat of paint is dry before applying the second coat to ensure a permanent finish. Furniture is appreciated for the character that it adds to a home, especially if there are textures or patterns.
PROTECT IT
At long last, utilize another scaled-down froth roller to apply a dainty layer of Polycrylic Protective Finish water-based protectant in gleam. You need to ensure you go over this coat delicately with the froth roller to smooth any air pockets that can happen with the froth roller. Permit 72 hours for it to dry before utilizing it; otherwise, it can get clingy.
More Interezsting Blogs Related to
“How to Fix Peeling Paint on Furniture”

Fix your peeling paint on furniture, and you’ll likely be preserving a bit of history too. If the work involved in repairing peeling paint on furniture sounds like it involves too much time and energy to do yourself, call 416.494.9095 or email Brian@HomePaintersToronto.com for a FREE quote or visit our website. And don’t forget to follow us on all our social channels below