
Porch crown molding is one of the most visible architectural details on the front of a Toronto home, and one of the first to show weather damage. Cracked, peeling, or rotting porch crown molding does not just look neglected. It signals to buyers and neighbours alike that the home's exterior has not been maintained, and left unaddressed, it allows moisture to penetrate deeper into the porch structure.
The good news is that most porch crown molding damage is repairable without a full replacement, provided the work is done correctly and the right products are used. This guide covers the complete repair and painting process from start to finish, with specific guidance for the freeze-thaw conditions Toronto homeowners deal with every spring and fall.
- What porch crown molding is and why it deteriorates faster on Toronto porches
- How to assess the damage and decide between repair and full replacement
- A complete step-by-step repair process including rot removal, filling, caulking, priming, and painting
- Which materials (wood, polyurethane, PVC) perform best in Toronto's climate
- Best paint and primer products for exterior porch crown molding
- Colour guidance for matching your molding to your home's exterior
- DIY vs. professional repair: what to consider before deciding
- What porch crown molding repair and painting costs in Toronto in 2026
- A real project case study
- FAQ answers to the most common homeowner questions
Want this handled professionally? Get a free quote for exterior porch carpentry and painting in Toronto.
With all of that, along with normal aging, if you have porch crown moulding, there will likely be some damage over time. On top of that, you might even find that some of the wood in the crown moulding on your porch cover could be rotting out. This is exactly the time for a little exterior porch crown moulding repair project. We have all the steps right here for you, too. Let's get started!
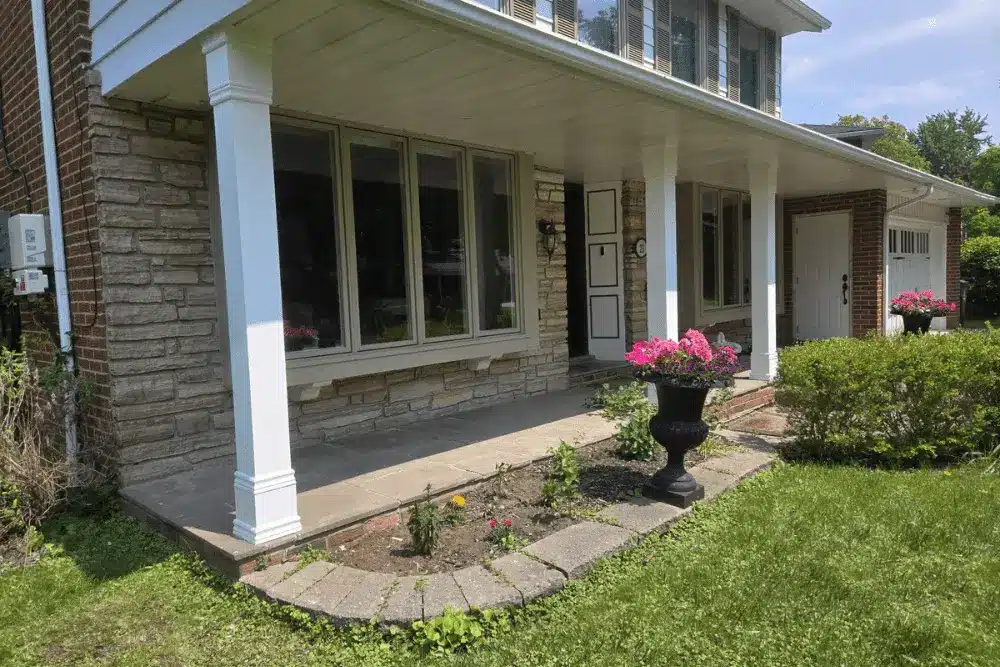
Properly repaired and painted porch crown moulding restores the front entry's architectural character and protects the porch structure from ongoing moisture damage.
What Is Porch Crown Moulding?
Before delving into the how-tos, let's take a quick look at what crown moulding is. Crown moulding is a decorative trim applied where the walls of a room meet the ceiling. It is typically used for capping cabinets, pilasters, and interior walls without significant functional benefits, but with an lasting aesthetic value. When placed on a porch, this accessory becomes more exposed to wear and tear and thus may require regular upkeep. Over time, due to constant exposure to harsh weather conditions, your porch's crown moulding can deteriorate. It might crack, warp or rot, depending on the material used. Painting not only improves the appearance by concealing these imperfections but also acts as a protective seal against further damage.
Why Porch Crown Molding Deteriorates Faster in Toronto
Porch crown molding occupies one of the most exposed positions on any home exterior. It sits at the junction of the porch ceiling and the fascia or beam below the roofline, which means it is exposed to rain from above, moisture from condensation below, and direct UV from the sun. On a covered porch the exposure is partially reduced, but on open porches or at gable ends where the molding transitions to the exterior wall, the exposure can be severe.
Toronto's climate compounds this significantly. The city experiences more than 100 freeze-thaw cycles per year. Every time moisture trapped in a crack in the molding or paint film freezes, it expands and widens the crack. Every thaw allows more water in. Over several cycles, even a small paint crack in porch crown molding can result in significant wood softening beneath the surface. This is why porch crown molding on Toronto homes that was last painted or repaired seven or eight years ago often requires more than just a recoat. The preparation work is where most of the effort and expertise is concentrated.
According to the Canadian Wood Council's guidance on finishing exterior wood, exterior wood coatings provide protective benefits only when the coating itself is intact and the substrate beneath is sound. Once paint cracks and allows moisture access to the wood beneath, the protective function of the coating is compromised, and the wood begins to deteriorate regardless of how good the paint product was. The practical implication for porch crown molding in Toronto is that annual inspection and early intervention on small cracks or peeling is far less expensive than addressing rot damage that has been allowed to develop over several seasons.
Assess the Damage First: Repair vs. Full Replacement
Assessing porch crown molding damage in Toronto requires probing for soft spots and checking for paint failure to decide between repair or replacement. Before picking up a scraper or a paint can, the right starting point is an honest assessment of the condition of the molding. Not all porch crown molding damage is equal, and the repair approach depends entirely on how far the deterioration has gone.
When Repair Is the Right Call
Surface paint failure (peeling, cracking, chalking) with no softness in the underlying wood is the best-case scenario. This requires scraping, sanding, caulking gaps, priming, and repainting. The wood itself is sound, and a proper paint system applied over prepared surfaces will perform for another seven to ten years.
Localized soft spots where moisture has penetrated but the surrounding wood is still firm can be addressed with a two-part epoxy wood filler after the soft material is removed. As This Old House's guide on repairing rotted trim with epoxy notes, epoxy is a smart option for confined areas of rot that yields a seamless result when properly primed and painted. The key requirement is that the wood surrounding the repair area is dry and structurally sound before the epoxy is applied.
When Full Replacement Is the Right Call
If the probe test (pressing a screwdriver or awl firmly into the molding along its length) reveals that significant sections are soft throughout, not just at the surface, the molding has deteriorated beyond what a filler repair can address. Attempting to fill and paint over structurally compromised crown molding produces a result that will fail again quickly, often within a single winter, as the wood continues to move and the filler loses its bond.
If more than 30 to 40 percent of the molding run is soft or structurally compromised, full removal and replacement is the most cost-effective long-term approach. In this case, the opportunity also exists to choose a more durable material for the replacement, which is discussed in the materials comparison section below.
Materials Comparison: Wood vs. Polyurethane vs. PVC for Exterior Porch Crown Molding
| Material | Weather Resistance | Paintability | Rot Risk | Weight | Best For Toronto Porches | Approx. Cost per Linear Foot |
|---|---|---|---|---|---|---|
| Wood (pine, poplar) | Moderate (requires paint maintenance) | Excellent | High if paint fails | Medium | Original-style replacement where paint is maintained regularly | $3 to $8 CAD |
| Polyurethane | High, moisture-resistant | Good, must be painted | None | Light | Replacement on open or semi-exposed porches; easy to install | $4 to $10 CAD |
| PVC (cellular) | Excellent, fully moisture-proof | Good, bonds well with paint | None | Light to medium | Replacement on full-exposure porches or humid climates; long service life | $5 to $12 CAD |
| MDF | Low (not suitable for exterior) | Excellent when dry | Extreme | Heavy | Interior only; not suitable for any exterior porch application | Not applicable |
For Toronto homeowners replacing porch crown molding rather than repairing it, polyurethane and cellular PVC are the materials our team recommends. Both eliminate the rot risk that makes wood porch crown molding a recurring maintenance item in Toronto's wet seasons. They take paint well over a bonding primer and, unlike wood, do not require back-priming or end-grain sealing before installation.
Step-by-Step: How to Repair and Paint Exterior Porch Crown Moulding
- For bare or newly installed wood crown molding: use an oil-based exterior primer or a high-adhesion acrylic exterior primer. Oil-based primer penetrates deeper into the wood grain, provides better stain blocking, and seals tannin bleed on species like cedar or pine. Sherwin-Williams Exterior Latex Wood Primer is a reliable water-based option for previously painted wood in good condition. For bare wood or tannin-rich species, an oil-based primer such as Zinsser Cover Stain provides better performance.
- For polyurethane or PVC crown molding: use a bonding primer specifically rated for synthetic or non-porous surfaces. Standard exterior primers do not adhere as well to polyurethane and PVC. A bonding primer creates the chemical adhesion layer the topcoat needs to grip.
- For epoxy-repaired areas: apply a coat of the epoxy repair manufacturer's recommended primer directly to the epoxy surface before the exterior primer coat, as epoxy requires specific adhesion promotion to accept paint reliably.
Painting Your Porch Crown Moulding
Now comes the time for the final step in your crown moulding repair: painting! Feel free to add in a little personality for this step as well. After all, you ended up saving loads of money doing your own crown moulding repair work. So, you might as well really go to town and show it off beautifully.
Black Satin is gorgeously muted black and looks amazing if you have grey or even reddish bricks. If you want to go lighter, Waynesboro Taupe is nice and warm and still gives an updated look to your front exterior entryway.
Whatever exterior paint you choose for your porch crown moulding, just be sure it complements your brick, siding and door nicely to really create an impact.
Best Paint Products for Exterior Porch Crown Moulding in Toronto
Two coats of topcoat are the professional standard for exterior porch crown molding, not one. The first coat seals the primer and establishes the colour. The second coat builds the film thickness required for durability through Toronto's freeze-thaw cycling. A single coat on exterior porch crown molding, even over a quality primer, will not provide sufficient protection and will show early weathering by the second or third winter.
| Product | Type | Key Benefit | Sheen | Notes |
|---|---|---|---|---|
| Sherwin-Williams Duration Exterior | 100% acrylic exterior | Excellent flexibility, UV resistance, durability | Satin or semi-gloss | Professional standard for Toronto exterior trim |
| Benjamin Moore Aura Exterior | 100% acrylic exterior | Strong adhesion, colour retention, flexibility | Satin or semi-gloss | Premium option; holds colour well on south-facing surfaces |
| Sherwin-Williams Emerald Exterior | Water-based alkyd exterior | Hard enamel finish, very durable on high-contact trim | Semi-gloss | Best choice for door surrounds and high-wear trim areas |
| Benjamin Moore Advance (exterior-rated application) | Water-based alkyd | Smoothest finish, self-levelling | Semi-gloss | For detailed profiled moldings where brush marks are a concern |
Porch Crown Moulding Colour Guidance for Toronto Homes
The most reliable approach to porch crown molding colour is to match it to the rest of the exterior trim on the home. A coordinated trim package (window frames, door casing, fascia, and crown molding all in the same colour) reads as intentional and well-maintained from the street. The porch crown molding is typically not the place for an accent colour. It is part of the trim framework that should visually connect all the exterior elements.
Classic white (Benjamin Moore Chantilly Lace, Benjamin Moore White Dove, or Sherwin-Williams Extra White) is the most universally appropriate porch crown molding colour on Toronto homes, working with brick, siding, and stone in virtually all colours.
For homeowners who want something more distinctive, a deep charcoal or near-black (Benjamin Moore Kendall Charcoal, Sherwin-Williams Iron Ore) as the full trim package including porch crown molding creates a high-contrast, architecturally strong exterior, particularly on homes with white or cream-coloured siding or light brick. This is the direction Black Satin, mentioned in the original guide, points toward, and it reads exceptionally well on the red and brown brick common on Toronto homes built between 1940 and 1980.
For broader colour guidance on how to coordinate porch and exterior trim colours with siding and doors, see our guide to picking exterior paint colours.
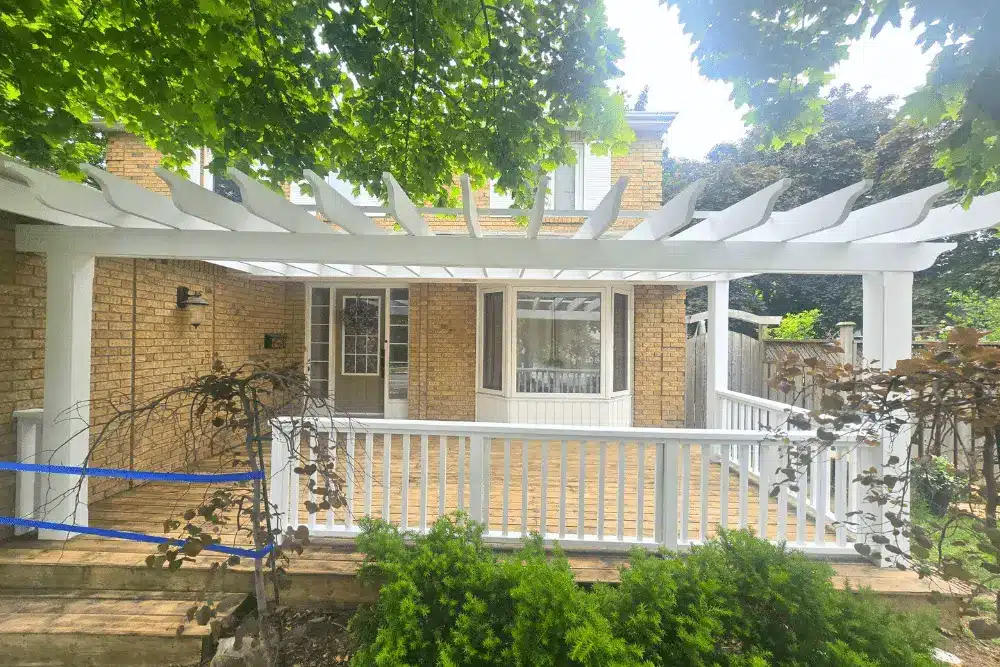
Matching porch crown moulding colour to the rest of the trim package creates a cohesive, maintained appearance that lifts the entire front entry from the street.
DIY vs. Professional Porch Crown Moulding Repair and Painting
Deciding whether to undertake crown moulding repair and painting as a do-it-yourself (DIY) project or to hire a professional can be challenging. Let's explore these two options in detail.
Choosing the DIY route can be an economical and rewarding experience. However, it's important to note that this approach is not for everyone. Here's what you need to consider before deciding on a DIY project:
Skills and Experience: Are you comfortable with manual work? Have you done similar repair tasks in the past? If you have basic handyman skills and don't mind getting your hands dirty, DIY might be for you.
Time Availability: DIY projects can be time-consuming, especially if you are new to the task.
Assess your situation based on these factors before making the decision. Whether you choose DIY or professional services, the primary goal should always be to ensure a long-lasting and quality repair of your porch's crown moulding.
DIY vs. Professional: A Practical Comparison
| Factor | DIY Approach | Professional Approach |
|---|---|---|
| Cost | Lower materials cost; higher time investment | Higher upfront cost; better long-term value |
| Skill required | Moderate; comfort with ladders, caulk, and painting essential | Professional prep and product knowledge ensures longer results |
| Risk of improper prep | High; most DIY failures come from skipped steps | Managed by experienced team who knows what to look for |
| Rot assessment accuracy | Often underestimated; homeowners miss soft spots | Systematic probe assessment covers full run of molding |
| Time required | Full weekend for average porch | Typically completed in one to two days by a professional team |
| Result durability | 3 to 5 years if prep is solid; shorter if steps skipped | 7 to 10 years with professional prep, primer, and two topcoats |
| Best for | Sound molding with surface paint failure only | Any rot, soft spots, replacement sections, or complex profiles |
The honest summary is this: porch crown molding repair is achievable as a DIY project when the damage is limited to surface paint failure with no wood softness, and when the homeowner is comfortable working on a ladder with caulk, primer, and a brush. When there is any rot, softness, or structural compromise in the molding, professional assessment and repair produces significantly better results and longevity.
How Much Does Porch Crown Moulding Repair and Painting Cost in Toronto?
DIY Cost Estimate
- Exterior-grade epoxy wood filler (for rot repairs): $25 to $50
- Paintable exterior caulk: $8 to $15 per tube (a typical porch may need 2 to 3 tubes)
- Exterior wood primer (Sherwin-Williams or Benjamin Moore): $55 to $80 per 3.78L
- Premium 100% acrylic exterior topcoat: $70 to $110 per 3.78L
- Sandpaper (multiple grits), tack cloths, brushes, painter's tape: $40 to $70
- Replacement crown molding material (if sections need replacing): $4 to $10 per linear foot for polyurethane or PVC
- Total DIY materials for repair and repaint of a standard Toronto front porch crown molding run (approximately 20 to 40 linear feet): $200 to $500 CAD depending on scope and extent of repair needed
Professional Cost Estimate
Professional porch crown molding repair and painting in Toronto typically ranges from $500 to $2,500 CAD depending on:
- The linear footage of crown molding on the porch
- The extent of rot damage and how much material needs replacing
- Whether the molding can be repaired in place or requires full removal and reinstallation
- The height and accessibility of the porch (two-storey or complex roofline access costs more)
- Whether carpentry repairs to the porch structure or fascia board are needed before painting
The largest cost variable is the carpentry repair scope. Painting alone on sound, prepped crown molding is straightforward. Finding and addressing rot that has extended into the porch soffit or fascia board behind the molding adds to the scope but prevents the far larger expense of having that damage discovered later during a home inspection or after a full repaint has been completed over compromised substrate.
For a precise quote based on your specific porch, request a free estimate from Home Painters Toronto. Our team has been handling exterior porch carpentry and painting across Toronto and the GTA since 1987 and backs all exterior work with a 3-year warranty. For broader exterior painting costs, see our exterior painting cost guide.
Real Project: Porch Crown Moulding Repair and Painting in Toronto
West Toronto Detached: Polyurethane Replacement Sections with Full Repaint
The situation: The homeowner contacted Home Painters Toronto after noticing that the front porch crown molding had significant peeling paint and visible cracking across the full run. A visual inspection from the ground suggested peeling paint only. Our team's probe assessment at the time of estimate revealed three sections totalling approximately 1.8 metres where the wood was soft and needed to be replaced before any painting could proceed.
What the job involved: Our carpentry team removed the three compromised sections of wood crown molding and replaced them with polyurethane crown molding matching the original profile. All remaining wood crown molding sections were assessed as sound and were prepared in place: scraped, sanded, and all cracks and gaps caulked with paintable exterior caulk. All nail holes in the new polyurethane sections were filled and sanded smooth. One full coat of Sherwin-Williams Exterior Latex Wood Primer was applied across all surfaces. Two coats of Sherwin-Williams Duration Exterior in a semi-gloss white were then applied by brush to the full crown molding run, ensuring full coverage into all profile details.
The result: A clean, uniform white finish across the full porch crown molding run, with no visible transitions between the original wood sections and the new polyurethane replacement sections. The homeowner noted a significant improvement in the overall appearance of the front porch entry, which had been the one element of the exterior that was detracting from an otherwise well-maintained property. The combination of polyurethane replacement material for the damaged sections and correct primer plus two topcoats on the remaining sections gives this job a projected service life of eight to ten years in Toronto conditions.
For more completed projects, visit our Toronto painting projects page.
Frequently Asked Questions About Porch Crown Molding Repair and Painting
For Toronto's freeze-thaw climate, polyurethane or cellular PVC crown molding is the best material choice for replacement sections of exterior porch crown molding. Both materials are moisture-resistant and will not rot if the paint film is compromised. Wood is the traditional and authentic choice and takes paint beautifully, but it requires a complete and intact paint system to remain rot-free. In Toronto, where the combination of freeze-thaw cycling and rain stress puts constant pressure on exterior paint films, polyurethane or PVC eliminates the rot risk and significantly reduces the long-term maintenance burden.
Press a screwdriver or awl firmly into the molding along its full length. If the wood feels firm and the tool does not penetrate beyond the paint surface, the molding is structurally sound and needs only prep and repainting. If the tool sinks into soft, crumbling wood, the molding needs repair at a minimum and possibly replacement of that section. If more than 30 to 40 percent of the run is soft, full removal and replacement with a rot-resistant material is the most practical long-term solution.
For wood porch crown molding: use an exterior-rated wood primer, either oil-based for bare wood and tannin-rich species, or a high-adhesion acrylic exterior primer for previously painted wood in good condition. Sherwin-Williams Exterior Latex Wood Primer is reliable for the latter. For polyurethane or PVC crown molding: use a bonding primer rated for synthetic surfaces. For epoxy-repaired areas: follow the epoxy manufacturer's primer recommendation before applying any exterior primer. In all cases, interior primer is not appropriate for exterior porch crown molding.
With proper prep (scraping, sanding, caulking, and full priming), and two coats of a premium 100% acrylic exterior topcoat, porch crown molding paint should last 7 to 10 years in Toronto conditions. The single biggest factor in longevity is the thoroughness of the prep. Paint applied over inadequate prep, skipped primer, or unfilled cracks will fail significantly faster, often within two to three seasons, as freeze-thaw cycling exploits every weakness in the film.
Yes, in most cases. If the molding is structurally sound and the damage is limited to surface paint failure, full repair and repainting in place is standard practice. The molding is scraped, sanded, caulked at all gaps and joints, primed, and painted without removal. Removal is only necessary when sections are structurally compromised and need to be replaced, or when the back face of the molding needs treatment for back-priming or moisture barrier application.
Semi-gloss is the recommended sheen for exterior porch crown molding. It is more moisture-resistant than satin, easier to clean, and shows a crisper paint line on detailed profiles. Flat or matte sheens absorb moisture faster and are not appropriate for any exterior porch trim in Toronto's climate.
Late May through mid-September is the most reliable window for exterior porch crown molding repair and painting in Toronto. Most exterior primers and paints require a minimum application temperature of 10 degrees Celsius, and temperatures must remain above that threshold through the full cure period after the last coat. Early spring and late fall can work if the weather is stable, but the risk of a cold snap interrupting curing is higher in those shoulder months. Never apply exterior paint to porch crown molding if rain is forecast within 48 hours or if nighttime temperatures are expected to drop below 5 degrees Celsius.
More Interesting Blogs Related to Exterior Porch Crown Moulding Repair and Painting
Need Your Porch Crown Moulding Repaired and Painted?
With over 37 years of experience in home painting and renovations, Home Painters Toronto handles the hard work for you. Call 416.494.9095 or email [email protected] for a FREE quote.