


How To Clean Paint Rollers
Knowing how to clean paint rollers correctly is the single maintenance skill that separates a professional quality paint finish on the next project from a finish riddled with fibre shed, dried paint flakes, and colour contamination from the previous job. Home Painters Toronto, the HomeStars Best of Award 2026 winner with over 1,200 positive reviews and 37 years serving the GTA, has maintained and cleaned professional grade paint rollers across thousands of interior and exterior projects. Paint rollers are an essential tool for any painter. They make painting large surfaces efficient and can help achieve a smooth, even finish. However, cleaning paint rollers properly is one of the most skipped steps in home painting, and skipping it correctly costs more in replacement rollers and ruined finish quality than the time saved.
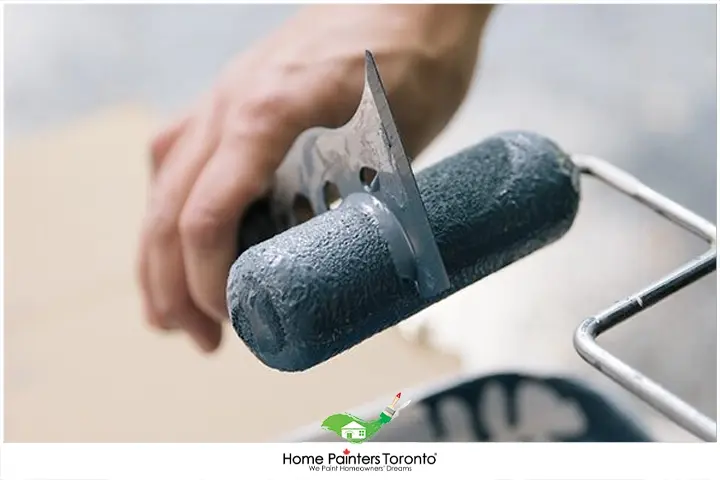
Rinsing a roller cover until the water runs completely clear, then squeezing it once more to confirm no paint remains in the core of the pile, is the step that most homeowners skip and the one that determines whether the next project starts with a truly clean roller.
How to Clean Paint Rollers: Why the Method Matters as Much as the Effort
A poorly cleaned roller does more damage to the next paint job than a new roller cover would. Latex paint that was not fully rinsed from a roller fibre forms hard dried nodules within the pile that leave texture marks in the fresh coat. Residual colour from a previous job contaminates the next colour when mixed into the fresh paint during loading. Solvent that was not fully removed from an oil based roller cover can soften freshly applied latex if the same roller is used for a different paint type on the next project.
The standard professional cleaning sequence takes approximately 10 to 15 minutes per roller for latex paint and 20 to 25 minutes for oil based paint. That investment preserves a roller cover that would cost $8 to $25 to replace, depending on the nap thickness and fibre quality. A premium professional grade roller cover that is properly cleaned and stored can be reused reliably across five to ten uses before the fibre quality degrades to the point where replacement makes sense.
Proper roller maintenance connects directly to finish quality throughout a painting project. For the context on which paint products are being applied through those rollers, see our guide on picking the right type of interior paint and our overview of common painting mistakes to avoid.
Why is it Important to Clean Paint Rollers?
Painting your home is probably one of the least expensive ways to refresh your home. You can do this either in the interior or exterior of your home, but regardless, painting can be the difference to having an attractive home. When it comes to painting, knowing the colour you want and the type of paint is essential. Having the proper tools and materials is equally important because you wouldn't have anything to paint with without them! Learning how to clean paint rollers for reuse is crucial for several reasons:
- Extending the life of your paint rollers: Proper cleaning and maintenance can help your paint rollers last longer, saving you money in the long run.
- Ensuring a smooth paint application: A clean paint roller will provide a more even and consistent finish.
- Preventing paint contamination: Reusing a dirty paint roller can contaminate your paint, causing issues with colour and finish.
Tools needed:
- 5 in 1 tool and bucket
- Firm bristle brush
- Paintbrush comb
- Putty knife
- Rubber gloves
- Safety glasses
According to professional painters, quality paint brushes and tools should always be a priority. For best results, it should always be about quality over quantity. In addition, when the best tools and materials are used, they will last a long time when cleaned and reused properly. With all this in mind, here is how to clean paint rollers.
Why Toronto's Seasonal Humidity Affects How Long Paint Rollers Take to Dry After Cleaning
Paint rollers cleaned in Toronto in January under forced air heating dry in a fraction of the time they take to dry in August at high summer humidity. A roller cover that is wet through from cleaning needs to be completely dry before it is stored or reused. A cover that is stored damp develops mould within the fibre that cannot be removed and permanently degrades the pile structure.
In summer, when indoor humidity in a Toronto home can exceed 60 percent without dehumidification, a cleaned roller cover benefits from being placed near a fan or in a well ventilated space rather than simply hung and left in still air. The target is full dryness throughout the pile, not just at the surface. Squeezing the cover gently after an hour of drying and checking for any remaining coolness in the core confirms whether more drying time is needed before storage.
How to Clean Paint Rollers
Think of a paint roller as a sponge, as it is very absorbent and can capture excess paint. Capturing any excess paint will be the difference between a finished and unfinished paint job. Also, it might be the difference between ultimately buying another expensive bucket of paint.
Use the curved edge 5 in 1 tool or a putty knife to remove excess paint from the roller and put it back into the paint bucket. This is why paint brushes and rollers should be cleaned before using them, because then little paint pieces would not easily fall off. The more paint removed off the paint roller before washing, the easier the job will be. A newspaper removes all the excess paint until none remains visible.
Washing Roller Frame
The roller frame should always be cleaned immediately after use for either latex or an oil based product. Rubber gloves are worn to remove the cover from the roller. The cover is put aside for a moment while the roller frame is cleaned. The quickest time to clean a roller frame is when the paint is still wet. Paints with a higher gloss are much tougher to clean.
- Oil paint: Use mineral spirits on a damp cloth to scrub off the paint.
- Latex paint: Warm water with a tiny amount of dish soap is used. A firm bristled brush with long handles helps scrub away tiny patches inside the roller frame.
- Eye protection should always be worn when dealing with solvents.
How to Clean the Roller Cover
For oil paint:
Latex paint:
How to Clean Latex Paint Rollers: The Correct Sequence for Water-Based Products
Latex paint cleaning is most effective when the paint is still wet. A roller left to partially cure for even one to two hours is significantly harder to clean than one addressed immediately after the painting session ends. The binders in acrylic latex begin to cross link within the fibre as they dry, and once cross linking has begun, water alone cannot dissolve the paint film.
How to Clean Paint Rollers: The Step Most Homeowners Skip That Ruins the Next Job
The most commonly skipped step in latex roller cleaning is the final rinse after washing. Most painters rinse the roller until the water running from the cover looks approximately clear, then set it aside. Professional painters continue rinsing until the water runs completely clear with no tint whatsoever, then squeeze the cover firmly from top to bottom once more to confirm no paint coloured water remains in the core of the pile. That extra rinse cycle is the step that determines whether the next project benefits from a clean roller or picks up a faint colour cast from the previous job.
Latex paint rinsed down a household sink drain is acceptable in Toronto because water based latex is not classified as household hazardous waste once sufficiently diluted. The key is to dilute heavily with running water and not to dispose of large volumes of concentrated latex paint down any drain. For more on paint related disposal decisions, see our guide on how to store paint properly, which covers both storage and end of-life paint decisions.

How to Clean Oil-Based Paint Rollers: Solvent Selection and Safety in a Toronto Home
Oil based paint roller cleaning requires mineral spirits or paint thinner and adequate ventilation throughout the process. According to Health Canada's guidance on volatile organic compounds in indoor environments, mineral spirits and paint thinners release VOCs at concentrations that can irritate the respiratory system and eyes. Cleaning oil based rollers in a garage with the door open, or outdoors, is the safest approach for a Toronto home where indoor air circulation is limited.
Oil-Based Paint Roller Cleaning: Solvent Choice and Disposal in Toronto
Used mineral spirits that contain dissolved oil based paint pigment and binder are household hazardous waste in Toronto and cannot be poured down the drain or put into regular garbage. The City of Toronto Household Hazardous Waste program accepts used paint solvents at designated depot locations and community environment days at no cost. Collecting used solvent in a sealed, labelled container between uses and taking it to a depot is the correct disposal approach for every Toronto homeowner using oil based products.
The solvent used to clean a roller can be reused across multiple cleaning sessions. After each use, the solvent and-paint mixture is poured into a sealed container and allowed to settle. The paint solids sink to the bottom over 24 to 48 hours. The clear solvent above the settled solids can be carefully poured off and reused for the next cleaning session. This process reduces the total volume of solvent that ultimately needs to be brought to the hazardous waste depot.
Tips for Cleaning Paint Rollers Easily
Here are easier ways to clean paint rollers.
Tip 1: Use a paint roller spinner
A paint roller spinner is a fantastic tool that makes cleaning paint rollers a breeze. This device spins the roller rapidly, forcing out excess paint and water. The correct process is to scrape off as much excess paint as possible using a 5 in 1 tool or a paint scraper first, then attach the roller to the spinner and hold it over a bucket or sink. Pumping the spinner handle spins the roller, forcing out the remaining paint and water.
Tip 2: Scrape off excess paint
Before cleaning begins, removing as much excess paint as possible is essential. Rolling the paint roller on a scrap piece of cardboard or a paint tray removes excess paint, then a paint scraper or a 5 in 1 tool removes any paint remaining on the roller.
Tip 3: Use the right cleaning solution
The type of paint used determines the best cleaning solution for the paint roller. Warm water and mild dish soap works for water based paints such as latex or acrylic. For oil based paints, paint thinner or mineral spirits is required, with proper ventilation throughout the process and disposal per the City of Toronto Household Hazardous Waste program.
Tip 4: Soak and scrub
A stubborn roller cover benefits from soaking in warm soapy water (or paint thinner for oil based paints) for at least 30 minutes. This loosens remaining paint before a stiff brush or roller cleaning tool is used to scrub away stubborn residue.
Tip 5: The short-term storage method
When a project breaks overnight or extends into the following day, the roller does not need to be fully cleaned for a short pause. Wrapping the roller cover tightly in plastic kitchen wrap or placing it in a sealed zip top bag excludes air from the wet paint and prevents the cover from drying out. The sealed cover can be stored this way for up to 24 hours for latex paint, or up to 48 hours for oil based paint, and returned to use without any cleaning in between.
Tip 6: Dry and store properly
After cleaning, the roller cover needs to be fully dry before storage. A roller spinner removes most of the surface water efficiently. Standing the cover on its end in a ventilated area completes the drying. The cover should be completely dry to the core of the pile before storage to prevent mould growth in the fibre.
Cleaning vs Replacing: When a Paint Roller Is Past Saving and When It Is Not
When Lint and Fibre Shed from Rollers Signals It Is Time to Replace
A paint roller cover reaches end of life when the pile fibre sheds into the wet paint during application. This produces small fibres or lint fragments visible in the dried paint film that can only be removed by sanding and repainting. No amount of cleaning reverses fibre breakdown once it has begun. A cover that leaves fibres on a test surface before a project should be replaced, not cleaned and reused.
| Condition | Correct Action | Notes |
|---|---|---|
| Cover fully loaded with wet paint, cleaned within 30 minutes | Clean with appropriate method; reuse | Full service life preserved with immediate cleaning |
| Cover partially dried with latex, some stiff sections | Soak in warm soapy water 30 minutes then scrub; assess after | If pile softens fully and shows no fibre damage, reuse; if sections remain stiff, replace |
| Cover dried with oil based paint | Soak in mineral spirits; assess after solvent cleaning | Dried oil based paint in fibre significantly harder to fully remove; test on scrap surface before use |
| Fibre shedding visible in wet paint during application | Replace immediately | No cleaning method restores a shedding cover; continuing use damages the paint finish |
| Pile compressed or matted on one side from heavy use | Replace | Compressed pile produces uneven application and visible texture variation in finish |
| Strong residual colour in pile despite multiple rinses | Continue rinsing until clear; replace if colour persists after three full wash cycles | Residual colour will contaminate the next paint job |
Storing Clean Paint Rollers: How to Extend Their Life Between Uses
A properly cleaned roller should be stored in a way that protects the pile from compression and dust accumulation. Storing rollers standing on their end or hanging vertically preserves the pile profile. A roller stored lying flat on the pile side for extended periods develops a flattened section that applies paint unevenly until the pile recovers, which can take several minutes of rolling on a primer surface before the flat section rounds out.
Roller covers stored in their original packaging after cleaning provide the best protection. Covers without original packaging can be stored in a clean paper bag, which allows the pile to breathe while protecting it from dust. Never store in an airtight plastic bag for extended periods after cleaning, as any residual moisture in the pile develops mould in a sealed environment. For parallel guidance on storing paint itself, see our guide on how to store paint properly.
To recap, knowing the colour and type of paint is essential for painting. Proper tools and materials are equally important. By knowing how to clean paint rollers, time and money are saved without a lot of effort!
Cleaning paint rollers may not be the most enjoyable task, but it is essential to maintain the quality of painting tools and ensure a smooth, even finish on every project. By following these steps, paint rollers can be kept in top condition and ready for the next painting project.
Frequently Asked Questions About How to Clean Paint Rollers
The first step before any water or solvent touches the roller is to roll the cover on a scrap piece of cardboard or a paint tray and then scrape the roller firmly with the curved edge of a 5 in 1 tool, pushing the excess paint back into the can. This recovers a significant volume of usable paint that would otherwise go down the drain with the wash water.
Partially dried latex paint on a roller cover can sometimes be revived by soaking the cover in warm soapy water for 30 to 60 minutes, then scrubbing with a firm bristle brush. Fully dried and cured latex paint in the pile fibre cannot be removed without damaging the fibre structure. A roller where the pile has stiffened sections that do not soften after soaking should be replaced.
Used mineral spirits that contain dissolved oil based paint are household hazardous waste in Toronto and cannot be poured down the drain or placed in regular garbage. The City of Toronto Household Hazardous Waste program accepts used paint solvents at designated depot locations and community environment days at no cost.
No. A roller being used for two consecutive coats of the same paint on the same day does not need to be cleaned between coats, provided the time between coats falls within the manufacturer's recommended recoat window. The roller should be wrapped tightly in plastic between coats to prevent the pile from drying out, which would cause fibre to release into the fresh coat.
A premium professional grade roller cover that is properly cleaned and stored immediately after each use can be reliably reused across five to ten painting sessions before the pile quality degrades noticeably. Budget roller covers with lower quality fibre bonding show pile shedding and matting sooner, often after two to three uses. The indicator that replacement is needed is pile shedding visible in the wet paint surface during application.
More Interesting Blogs Related to "How to Clean Paint Rollers"
Need Professional Painting Help Instead?
Home Painters Toronto is the HomeStars Best of Award 2026 winner with a lifetime warranty on interior painting and 37 years serving the GTA. Call 416-494-9095 or email [email protected] for a FREE same-day estimate.